Welcome to the unofficial iced-rs guide
Iced is an Open Source GUI library written in rust to create beautiful and minimal cross platform applications. It leverages the power of Google’s Skia (via tiny-skia) for software rendering and wGPU for hardware rendering. It can render beautiful UI while maintaining clean and maintainable code by using the ELM (or MVU) architecture.
Iced focuses on Simplicity and type-safety so that you can concenterate on your implementation without any framework specific distractions.
This guide tries to explain the basics of the Iced GUI library (mostly 0.14) for the Rust programming language.
Most of the discussions and community talk are centered around the iced discord. If you want to talk with people about iced, that’s probably the best place. If you do not like discord, there is a discourse and zulip as well.
Disclaimer
To make it clear at the beginning. This is not an official guide. It is not approved by the iced-rs team! If you search for the official documentation or iced book take a look at the Iced website.
Different versions
Since iced develops quite fast you might encounter big breaking changes in different versions including between the latest version and the master branch (dev version). A lot of people on the discord use the master branch and talk about features in it, so keep that in mind if you do not find them in the latest release.
Documentation Resources
You will find docs of the released iced versions here on docs.rs. If you want to see the docs of the master branch (dev version) you can get them here. There are a lot of small examples available in the example’s directory of the iced repo. But make sure you select the proper git tag/branch for the iced version that you use.
Since the last version, there is also a new, great pocket guide that I advise everyone to read.
Some large structural changes are discussed and proposed in rfc’s that can be found in the rfcs repository. If you are wondering when and what new features are planned, you can take a look at the roadmap.
Other Learning Resources
There are multiple guides and tutorials that help you to learn iced, including this guide and the official book. Here is a list of other cool resources that you might find helpful:
- awesome-iced: a list of applications that use iced
- Github Markdown Tutorial: A very large tutorial covering a lot of stuff, but a bit out of date.
- Youtube Text Editor Tutorial: This is a tutorial on how to build a text editor with iced 0.10, so pretty out of date. It is still a good video tutorial, but a lot of the stuff won’t work in the latest iced version and can be done way easier with newer versions.
- 7GUIs in Rust with Iced: 7GUIs is a benchmark for comparing GUI frameworks. It defines seven tasks that represent common GUI programming challenges. In this repository, you’ll find each of the 7 tasks implemented using Iced.
- Example Applications that show how to structure larger apps
- icebreaker: An application that shows great how a larger application can be made
- iced_receipts: A small app that shows advanced structural patterns for iced applications
Other Crates
A list of other crates that you might find helpful while creating a gui with iced.
Caution: since iced evolves pretty fast, keep in mind that the following crates might be for different versions of iced and thus incompatible with the version that you are using
- iced_aw: Additional widgets from the community
- rfd: Pop-ups and file dialogs
- Diagramms/Plotting
- iced_aksel An experimental but promising and good looking diagram wrapping the Aksel plotting core
- iced_plot A GPU-accelerated plotting widget for Iced
- plotters-iced: Plotters backend for iced - for Plotting data
- sweeten: sweeten your daily iced brew
- webview
- LegitCamper/iced_webview: A webview widget for Iced using the Ultralight/Webkit browser engine (notably the licence of the browser engine can be restrictive depending on your use case)
- csmoe/iced-webview: A webview widget based on the chromium embedded framework
- iced_divider: “An Iced widget used to change the size of adjacent containers using the mouse horizontally or vertically.”
- modav_widgets: custom widgets and experimental UI components for the modav project (very nice table and tree view widget)
- A Disruption’s widgets: a collection of high quality custom widgets
- iced_toasts: add-on crate to provides a simple way to add toast notifications
- iced_dialog: provides a native, customizable message dialog widget
- iced_split: split widgets (vertical and horizontal draggable splits)
- iced_audio: Helpful widgets for audio applications (although unmaintained, and still on iced 0.9 and pretty out of date)
- fluent_iced_gallery: Showcases a sample of widgets styled according to fluent design principles
- iced_drop: A small library which provides a custom widget and operation to make drag and drop easier to implement
- iced_table: A table widget
- iced_custom_highlighter: A custom syntax highlighter that uses the colors from your app’s Theme
- iced_term: Terminal emulator widget powered by ICED framework and alacritty terminal backend
- frostdbyte_terminal: A terminal widget with customizable datastream
- slippery: A slippy map widget for the Iced toolkit
- iced_gif: A gif widget for iced
- iced_palace: A royal collection of exquisite widgets and helpers to rule your iced kingdom
- iced_nodegraph: A high-performance node graph editor widget
- frostmark: An HTML + Markdown viewer for iced
- iced_selection: selectable text
- iced_viewless: Viewless application runtime based on iced primitives, enabling background services without UI
- iced-fluent-theme: A Fluent 2 inspired theme for the Iced GUI library
Guide Versions
The guide tries to be up to date for one iced version. Older versions of this guide for older iced versions can be found via the tags in the git repo. Those versions are simply old versions of this guide and not maintained!
Contribution
If you want to contribute to this guide, you can open an issue on GitHub and/or make a pull request. We are very happy for if you decide to contribute. If you want to discuss your changes or ideas before contributing, you can open an issue or send a message in the iced discord.
© Héctor Ramón (hecrj) for the iced logo.
Frequently Asked Questions
Can I make a mobile app with iced?
Not really. Iced is not designed for mobile. But there is a test library for mobile (IOS and Android).
There is also a discord thread for making an android app with some success in running an iced app on android. For IOS, there is this repository, but it is marked as archived and the last commit is years old.
Is there an easy way to create pop-ups?
Iced has no built in way for pop-ups such as error, ok/cancel and file dialog popups. Although you could build them by creating multiple windows, this can be a bit complicated at the beginning. A lot of people simply use rfd for that use case, which works great. Another option for message dialogs is iced_dialog, which provides an iced “native” implementation with no extra dependencies, or the Generic Overlay widget from A Disruption’s custom widgets repo.
How can I run stuff in the background / multithreaded / async?
You can do that using Subscriptions and Tasks. Take a look at the Runtime section to learn more about them.
Can I use iced from another languages?
Although I would not advise you to do so, there is a python binding and a haskell wrapper.
When is the next release, and what features will it bring with it?
The next release will probably happen when the to-dos on the roadmap are finished.
Serde support for iced types?
There was a discussion on discord about adding serde support for the types in iced like Theme and Color. In the end, hecrj (maintainer of iced) was decided against it.
Tray Icon Support
Iced has currently no build in tray icon support. There are other rust crates that you can use to create a tray icon. You could use tray-icon-rs for example (note that it has a large gtk dependency).
Quickstart
In this section, you will learn in detail about how iced uses the ELM architecture for it’s application design. We also, learn how to write a simple counter application which increments or decrements counts with buttons.
Architecture
The architecture of iced is inspired by the elm architecture. This architecture splits your code into 4 main parts:
- Messages
- State
- Update Logic
- View Logic

NOTE: The snippets shown below are just for example purposes and will not compile.
State
The state contains all the data that your program wants to store throughout its lifespan. This is implemented using a struct. For example, in case of a simple counter app, which increments or decrements the current count value, the state would be like this,
struct Counter {
    count: i32
}
In the above snippet, all we need is a count value for a simple counter application. hence the state.
Message
The message defines any events or interactions that your program will care about. In iced, it will be implemented using the rust enum. For example, let’s take a simple counter app, the Messages / Events that might occur are stored in the Message enum, For example,
#[derive(Debug, Clone, Copy)]
enum Message {
    IncrementCount,
    DecrementCount
}
Update Logic
The update logic is called every time a message is emitted and can operate based on this message. This logic is the only one that can change the state of your application. A rough example of update logic with respect to the previous counter example is below,
fn update(&mut self, message: Message) -> iced::Task<Message> {
    match message {
        Message::IncrementCount => self.count += 1,
        Message::DecrementCount => self.count -= 1
    }

    iced::Task::none()
}
View Logic
The view logic generates the view, elements/widgets, and layout based on the current state. The view logic is called every time after the update logic is called. So for a simple counter app, all we need is a text view and two buttons. We can declare our UI as follows,
fn view(&self) {
    let ui = column![
        button("+").on_press(Message::IncrementCount),
        text(self.count),
        button("-").on_press(Message::DecrementCount)
    ]
}
Now that we got a basic understanding of the ELM architecture, we can deep dive into Iced and create a simple counter app.
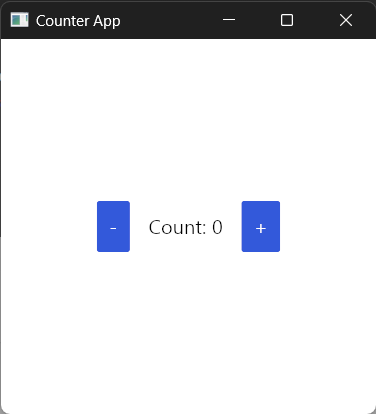
A minimal Application - Counter
Our goal is to create a simple counter where we have a number displayed that we can increase or decrease with two buttons.
Creating a new Project
First of all, make sure Rust is installed in your system. If not head over to Rust Installation Page.
NOTE: Iced 0.14 (the latest release as of me writing this) requires Rust 1.88 or above.
rustupis the preferrable way of managing your Rust toolchain(s).
After installing rust, create a new binary crate by executing,
$ cargo new counter-app-iced
$ cd counter-app-iced
Add Iced crate by executing,
$ cargo add iced
Now, build the app using
$ cargo run
On successful build, you can see the text Hello World is printed on console. Now we are ready to create our beautiful GUIs using Iced.
1. Defining the State
For the state, we define a struct. For the counter, we need to store the current value of the counter.
use iced::widget;

struct Counter {
    // This will be our state of the counter app
    // a.k.a the current count value
    count: i32,
}

#[derive(Debug, Clone, Copy)]
enum Message {
    // Emitted when the increment ("+") button is pressed
    IncrementCount,
    // Emitted when decrement ("-") button is pressed
    DecrementCount,
}

// Implement our Counter
impl Counter {
    fn new() -> Self {
        // initialize the counter struct
        // with count value as 0.
        Self { count: 0 }
    }

    fn update(&mut self, message: Message) -> iced::Task<Message> {
        // handle emitted messages
        match message {
            Message::IncrementCount => self.count += 1,
            Message::DecrementCount => self.count -= 1,
        }

        iced::Task::none()
    }

    fn view(&self) -> iced::Element<'_, Message> {
        // create the View Logic (UI)
        let row = widget::row![
            widget::button("-").on_press(Message::DecrementCount),
            widget::text!("Count: {}", self.count),
            widget::button("+").on_press(Message::IncrementCount)
        ]
        .spacing(10);

        widget::container(row).center(iced::Length::Fill).into()
    }
}

fn main() -> iced::Result {
    // run the app from main function
    iced::application(Counter::new, Counter::update, Counter::view)
        .title("Counter Example")
        .run()
}
2. Defining the Message
For our counter, we have two major events that matter to us. Increasing and decreasing the counter.
The message is represented as an enum with two variants, IncrementCounter and DecrementCounter.
use iced::widget;

struct Counter {
    // This will be our state of the counter app
    // a.k.a the current count value
    count: i32,
}

#[derive(Debug, Clone, Copy)]
enum Message {
    // Emitted when the increment ("+") button is pressed
    IncrementCount,
    // Emitted when decrement ("-") button is pressed
    DecrementCount,
}

// Implement our Counter
impl Counter {
    fn new() -> Self {
        // initialize the counter struct
        // with count value as 0.
        Self { count: 0 }
    }

    fn update(&mut self, message: Message) -> iced::Task<Message> {
        // handle emitted messages
        match message {
            Message::IncrementCount => self.count += 1,
            Message::DecrementCount => self.count -= 1,
        }

        iced::Task::none()
    }

    fn view(&self) -> iced::Element<'_, Message> {
        // create the View Logic (UI)
        let row = widget::row![
            widget::button("-").on_press(Message::DecrementCount),
            widget::text!("Count: {}", self.count),
            widget::button("+").on_press(Message::IncrementCount)
        ]
        .spacing(10);

        widget::container(row).center(iced::Length::Fill).into()
    }
}

fn main() -> iced::Result {
    // run the app from main function
    iced::application(Counter::new, Counter::update, Counter::view)
        .title("Counter Example")
        .run()
}
3. Implementing the Counter
To create a window, we implement the update function for our Counter.
Initial state
Next, we need to set out initial value of our state, which is the count value. The new function helps us to do exactly that. The state of the Counter is returned with it’s initial count value as 0.
use iced::widget;

struct Counter {
    // This will be our state of the counter app
    // a.k.a the current count value
    count: i32,
}

#[derive(Debug, Clone, Copy)]
enum Message {
    // Emitted when the increment ("+") button is pressed
    IncrementCount,
    // Emitted when decrement ("-") button is pressed
    DecrementCount,
}

// Implement our Counter
impl Counter {
    fn new() -> Self {
        // initialize the counter struct
        // with count value as 0.
        Self { count: 0 }
    }

    fn update(&mut self, message: Message) -> iced::Task<Message> {
        // handle emitted messages
        match message {
            Message::IncrementCount => self.count += 1,
            Message::DecrementCount => self.count -= 1,
        }

        iced::Task::none()
    }

    fn view(&self) -> iced::Element<'_, Message> {
        // create the View Logic (UI)
        let row = widget::row![
            widget::button("-").on_press(Message::DecrementCount),
            widget::text!("Count: {}", self.count),
            widget::button("+").on_press(Message::IncrementCount)
        ]
        .spacing(10);

        widget::container(row).center(iced::Length::Fill).into()
    }
}

fn main() -> iced::Result {
    // run the app from main function
    iced::application(Counter::new, Counter::update, Counter::view)
        .title("Counter Example")
        .run()
}
Update logic
Now we have to handle the messages that are emitted by the View Logic. The update function does exactly that. The update function get called every time when the View Logic emits a message. We use the rust’s powerful match expression to handle messages. Here we use the match expression to increase the count when IncrementCount is emitted and decrease the count when DecrementCount is emitted.
use iced::widget;

struct Counter {
    // This will be our state of the counter app
    // a.k.a the current count value
    count: i32,
}

#[derive(Debug, Clone, Copy)]
enum Message {
    // Emitted when the increment ("+") button is pressed
    IncrementCount,
    // Emitted when decrement ("-") button is pressed
    DecrementCount,
}

// Implement our Counter
impl Counter {
    fn new() -> Self {
        // initialize the counter struct
        // with count value as 0.
        Self { count: 0 }
    }

    fn update(&mut self, message: Message) -> iced::Task<Message> {
        // handle emitted messages
        match message {
            Message::IncrementCount => self.count += 1,
            Message::DecrementCount => self.count -= 1,
        }

        iced::Task::none()
    }

    fn view(&self) -> iced::Element<'_, Message> {
        // create the View Logic (UI)
        let row = widget::row![
            widget::button("-").on_press(Message::DecrementCount),
            widget::text!("Count: {}", self.count),
            widget::button("+").on_press(Message::IncrementCount)
        ]
        .spacing(10);

        widget::container(row).center(iced::Length::Fill).into()
    }
}

fn main() -> iced::Result {
    // run the app from main function
    iced::application(Counter::new, Counter::update, Counter::view)
        .title("Counter Example")
        .run()
}
Tip: Use
count.saturating_add(1)orcount.saturating_sub(1)for more error proof and optimized code.
View logic
The only thing left is to define our View (a.k.a UI). Define your View Logic in the view function. In iced, all UI components are called widgets. For a counter, we need two button widgets (one for incrementing and another for decrementing) and a text widget. They need to be aligned one after another in a horizontal manner. So, we use row widget macro to align our widgets in a horizontal manner.
use iced::widget;

struct Counter {
    // This will be our state of the counter app
    // a.k.a the current count value
    count: i32,
}

#[derive(Debug, Clone, Copy)]
enum Message {
    // Emitted when the increment ("+") button is pressed
    IncrementCount,
    // Emitted when decrement ("-") button is pressed
    DecrementCount,
}

// Implement our Counter
impl Counter {
    fn new() -> Self {
        // initialize the counter struct
        // with count value as 0.
        Self { count: 0 }
    }

    fn update(&mut self, message: Message) -> iced::Task<Message> {
        // handle emitted messages
        match message {
            Message::IncrementCount => self.count += 1,
            Message::DecrementCount => self.count -= 1,
        }

        iced::Task::none()
    }

    fn view(&self) -> iced::Element<'_, Message> {
        // create the View Logic (UI)
        let row = widget::row![
            widget::button("-").on_press(Message::DecrementCount),
            widget::text!("Count: {}", self.count),
            widget::button("+").on_press(Message::IncrementCount)
        ]
        .spacing(10);

        widget::container(row).center(iced::Length::Fill).into()
    }
}

fn main() -> iced::Result {
    // run the app from main function
    iced::application(Counter::new, Counter::update, Counter::view)
        .title("Counter Example")
        .run()
}
In the above code, we can see that the button’s on_press function accepts the message type to be emitted.
NOTE: The
view()function returns the typeElement<'_, Message>. So, we use.into()for conversion purpose.
That’s pretty much everything for a simple counter app. Now, let’s run it.
4. Running the Counter
To run the counter we first create a application with the application function.
With that function we define our state’s boot, update and view functions.
This illicitly defines out state type and the message type.
Then we specify our window title and run the counter.
use iced::widget;

struct Counter {
    // This will be our state of the counter app
    // a.k.a the current count value
    count: i32,
}

#[derive(Debug, Clone, Copy)]
enum Message {
    // Emitted when the increment ("+") button is pressed
    IncrementCount,
    // Emitted when decrement ("-") button is pressed
    DecrementCount,
}

// Implement our Counter
impl Counter {
    fn new() -> Self {
        // initialize the counter struct
        // with count value as 0.
        Self { count: 0 }
    }

    fn update(&mut self, message: Message) -> iced::Task<Message> {
        // handle emitted messages
        match message {
            Message::IncrementCount => self.count += 1,
            Message::DecrementCount => self.count -= 1,
        }

        iced::Task::none()
    }

    fn view(&self) -> iced::Element<'_, Message> {
        // create the View Logic (UI)
        let row = widget::row![
            widget::button("-").on_press(Message::DecrementCount),
            widget::text!("Count: {}", self.count),
            widget::button("+").on_press(Message::IncrementCount)
        ]
        .spacing(10);

        widget::container(row).center(iced::Length::Fill).into()
    }
}

fn main() -> iced::Result {
    // run the app from main function
    iced::application(Counter::new, Counter::update, Counter::view)
        .title("Counter Example")
        .run()
}
NOTE:
iced::Resultis simply a type alias forResult<(), iced::Error>.
5. Full Code
Now that we completed our simple counter application, the complete code will look like this.
use iced::widget;

struct Counter {
    // This will be our state of the counter app
    // a.k.a the current count value
    count: i32,
}

#[derive(Debug, Clone, Copy)]
enum Message {
    // Emitted when the increment ("+") button is pressed
    IncrementCount,
    // Emitted when decrement ("-") button is pressed
    DecrementCount,
}

// Implement our Counter
impl Counter {
    fn new() -> Self {
        // initialize the counter struct
        // with count value as 0.
        Self { count: 0 }
    }

    fn update(&mut self, message: Message) -> iced::Task<Message> {
        // handle emitted messages
        match message {
            Message::IncrementCount => self.count += 1,
            Message::DecrementCount => self.count -= 1,
        }

        iced::Task::none()
    }

    fn view(&self) -> iced::Element<'_, Message> {
        // create the View Logic (UI)
        let row = widget::row![
            widget::button("-").on_press(Message::DecrementCount),
            widget::text!("Count: {}", self.count),
            widget::button("+").on_press(Message::IncrementCount)
        ]
        .spacing(10);

        widget::container(row).center(iced::Length::Fill).into()
    }
}

fn main() -> iced::Result {
    // run the app from main function
    iced::application(Counter::new, Counter::update, Counter::view)
        .title("Counter Example")
        .run()
}
In the next section, you will see about common layouting techniques that iced offers.
Layout
In this section, you will learn about different layouting widgets and techniques that iced offers us to align and place widgets. In addition, you will learn some of the basic layouting practices. These layout techniques are used to maintain best UI structure and maintain responsiveness.
Element::explain
When styling a GUI, often the result does not look exactly what you wanted it to look like. Therefore, you debug your layout.
In web development, you can use the inspection tool of your browser to show the layout and borders of your elements.
In iced, we don’t have an inspection tool. But we have the Element::explain function that we can apply to any Element.
This function will draw a line around the element and all of its children. With that, you can debug how spacing and sizing are applied by the renderer.
Here is a short snipped that uses explain:
iced::Element::new(your_widget).explain(iced::Color::BLACK)Length
Length is used to fill space in a specific dimension. The Length enum also has capablities of being responsive.
The Length enum has the following variants:
Length::FillLength::FillPortion(u16)Length::ShrinkLength::Fixed(f32)
1. Length::Fill variant
Length::Fill is used to set a widget’s width or height to fill the viewport. For example, setting a container’s width property to Length::Fill will set the container’s width to fill the available space.
let ui = container(...)
    .width(Length::Fill)
    .height(50.0);
This will result in the following,

2. Length::FillPortion(u16) variant
Length::FillPortion(u16) is used to set width or height to a collection of widgets in a specified ratio. This enum is mostly used in collection widgets such as row or column.
Length::Fill is equivalent to Length::FillPortion(1).
Let’s say we have two elements: one with FillPortion(3) and one with FillPortion(2). The first will get 2 portions of the available space, while the second one would get 3. So basically, the two elements will get it’s portions in the ratio of 3:2.
let my_row = row![
    container(...)
        .width(Length::FillPortion(2)),
    container(...)
        .width(Length::FillPortion(3)),
].height(50.0)
This will result in the following,

Shrink
Length::Shrink is used to set the minimum length that an element needs to be properly displayed. This length will be independent from anything else. For example, a container will take the length of it’s child element. If the inner element is Fill, it will collapse under the outer Shrink.
Fixed
Length::Fixed(f32) is used to set a fixed length. This length will be independent from anything else.
Length::Fixed(15.0)Length::from(15.0)Length::from(15)Columns and Rows
The two most important structs for laying out widgets are Column and Row.
Both lay out their children in one direction. The column organizes the widgets vertically and the row horizontally.

By default, they align the items in the top left corner of their space.
A convenient way to create columns and rows is with the column! and row! macros.
We saw one of them in the Minimal Application - Counter.
use iced::widget;

struct Counter {
    // This will be our state of the counter app
    // a.k.a the current count value
    count: i32,
}

#[derive(Debug, Clone, Copy)]
enum Message {
    // Emitted when the increment ("+") button is pressed
    IncrementCount,
    // Emitted when decrement ("-") button is pressed
    DecrementCount,
}

// Implement our Counter
impl Counter {
    fn new() -> Self {
        // initialize the counter struct
        // with count value as 0.
        Self { count: 0 }
    }

    fn update(&mut self, message: Message) -> iced::Task<Message> {
        // handle emitted messages
        match message {
            Message::IncrementCount => self.count += 1,
            Message::DecrementCount => self.count -= 1,
        }

        iced::Task::none()
    }

    fn view(&self) -> iced::Element<'_, Message> {
        // create the View Logic (UI)
        let row = widget::row![
            widget::button("-").on_press(Message::DecrementCount),
            widget::text!("Count: {}", self.count),
            widget::button("+").on_press(Message::IncrementCount)
        ]
        .spacing(10);

        widget::container(row).center(iced::Length::Fill).into()
    }
}

fn main() -> iced::Result {
    // run the app from main function
    iced::application(Counter::new, Counter::update, Counter::view)
        .title("Counter Example")
        .run()
}
There, we created a Row with three children inside. One text and two buttons. The syntax for columns is the same.
You can put any Element inside a Column or Row.
Alignment
Of course, we can change the horizontal alignment for columns and the vertical alignment for rows.

This is how they would align in the center.
In code, if you want to set the Alignment you can call the align_x method on your column/row. It will return itself with the new alignment.
let some_column = iced::widget::column![
    "Hello World!",
    "Another Hello World!"
].align_x(iced::Alignment::Center)
Spacing
Because you cannot set margins in Iced and often want to add space between elements.
Columns and rows provide a spacing method to control the gap/spacing.
Below is an example of how to use spacing on a column:
let some_column = iced::widget::column![
    "Hello World!",
    "Another Hello World!"
].spacing(20)
Wrapping
Both row and column have the ability to wrap their children elements. You enable this by calling the wrap method on a row or column.
Once wrapping is activated, the layout of the element’s children changes. If the available space fills up, any extra children automatically move to a new row or column.
Container
The Container is useful when aligning items. A Container has one child element (could be a button, text, column, row, etc.).
use iced::{widget, Length};
use iced::alignment::{Horizontal, Vertical};

let stuff_centered = widget::Container::new("Some Text")
    .align_x(Horizontal::Center)
    .align_y(Vertical::Center)
    .width(Length::Fill)
    .height(Length::Fill);
NOTE:
We use
widthandheightto maximize the size of the container, creating extra space for centering.However, this is not strictly necessary if the container is already large enough; without additional space, there will be no noticeable difference between applying alignment and not applying any alignment.
Both align_x and align_y methods are available for alignment purposes on Container, along with additional align_{top,right,bottom,left} helper methods.
Themes and styling
Iced lets you customize the look and feel of your app on multiple levels:
- Singular widget instances can have unique looks.
- Themes can define their own colorschemes and base widget styles, which are used by default.
Themes
You can set the theme used by your app using Application::theme:
fn main() -> iced::Result {
    iced::application(...)
        .theme(|_| iced::Theme::Dracula)
        .run()
}
A nicer way to do this is by storing the theme in your app struct, then implementing a theme method (or something similar) for it which looks something like this:
use iced::{Element, Theme, widget::pick_list};

fn main() -> iced::Result {
    iced::application(App::default, App::update, App::view)
        .theme(App::theme)
        .run()
}

#[derive(Default)]
struct App {
    theme: Option<Theme>,
}

#[derive(Debug, Clone)]
enum Message {
    ThemeChanged(Theme),
}

impl App {
    fn theme(&self) -> Option<Theme> {
        self.theme.clone()
    }

    fn update(&mut self, message: Message) {
        match message {
            Message::ThemeChanged(theme) => self.theme = Some(theme),
        };
    }

    fn view(&self) -> Element<'_, Message> {
        pick_list(Theme::ALL, self.theme.clone(), Message::ThemeChanged)
            .placeholder("Choose a theme...")
            .into()
    }
}
NOTE: Returning
Option<Theme>allows us to fall back to the default theme (this depends on the user’s OS settings) when we returnNone.This is reactive, i.e. changing that preference will cause our app to react as well, so long as we still return
None.
Then you can use it like so:
use iced::{Element, Theme, widget::pick_list};

fn main() -> iced::Result {
    iced::application(App::default, App::update, App::view)
        .theme(App::theme)
        .run()
}

#[derive(Default)]
struct App {
    theme: Option<Theme>,
}

#[derive(Debug, Clone)]
enum Message {
    ThemeChanged(Theme),
}

impl App {
    fn theme(&self) -> Option<Theme> {
        self.theme.clone()
    }

    fn update(&mut self, message: Message) {
        match message {
            Message::ThemeChanged(theme) => self.theme = Some(theme),
        };
    }

    fn view(&self) -> Element<'_, Message> {
        pick_list(Theme::ALL, self.theme.clone(), Message::ThemeChanged)
            .placeholder("Choose a theme...")
            .into()
    }
}
Complete example
main.rs
use iced::{Element, Theme, widget::pick_list};

fn main() -> iced::Result {
    iced::application(App::default, App::update, App::view)
        .theme(App::theme)
        .run()
}

#[derive(Default)]
struct App {
    theme: Option<Theme>,
}

#[derive(Debug, Clone)]
enum Message {
    ThemeChanged(Theme),
}

impl App {
    fn theme(&self) -> Option<Theme> {
        self.theme.clone()
    }

    fn update(&mut self, message: Message) {
        match message {
            Message::ThemeChanged(theme) => self.theme = Some(theme),
        };
    }

    fn view(&self) -> Element<'_, Message> {
        pick_list(Theme::ALL, self.theme.clone(), Message::ThemeChanged)
            .placeholder("Choose a theme...")
            .into()
    }
}
Custom themes
The built-in iced::Theme type has a Custom variant which can be created using Theme::custom (or Theme::custom_with_fn for greater control over the generated color palette).
If you need even more customization, you can create your own Theme type. The requirements are:
- Implement
Basefor your custom type. - For each widget you plan to support, implement its
Catalogtrait (if it has one) and the dependencies of that trait.
For a reference custom theme, see iced_material.
Styling
Per-widget styling is done via styling methods. These take &Theme (usually) and return a widget Style. The following examples are made with the button widget in mind, but most things apply to other widgets as well.
Most widgets include a default styling method, but some also have extras. You can use these by passing them to the widget’s style method:
use iced::{
    Element, Theme, border, color,
    widget::{button, row},
};

fn main() -> iced::Result {
    iced::run(App::update, App::view)
}

#[derive(Default)]
struct App;

#[derive(Debug, Clone)]
enum Message {
    Noop,
}

impl App {
    fn update(&mut self, message: Message) {
        match message {
            Message::Noop => {}
        }
    }

    fn view(&self) -> Element<'_, Message> {
        row![
            button("Built-in 'danger' style")
                .on_press(Message::Noop)
                .style(button::danger),
            button("User defined inline style")
                .on_press(Message::Noop)
                .style(|_, _| button::Style {
                    background: Some(color!(0x1e1e2e).into()),
                    text_color: color!(0xc0ffee),
                    border: border::rounded(10),
                    ..Default::default()
                }),
            button("User defined style method")
                .on_press(Message::Noop)
                .style(button_danger_text)
        ]
        .spacing(10)
        .into()
    }
}

// This is a *slightly* modified version of button::text
fn button_danger_text(theme: &Theme, status: button::Status) -> button::Style {
    let palette = theme.extended_palette();

    let base = button::Style {
        text_color: palette.danger.base.color,
        ..button::Style::default()
    };

    match status {
        button::Status::Active | button::Status::Pressed => base,
        button::Status::Hovered => button::Style {
            text_color: palette.danger.base.color.scale_alpha(0.8),
            ..base
        },
        button::Status::Disabled => button::Style {
            text_color: palette.danger.base.color.scale_alpha(0.5),
            ..base
        }
    }
}
You can also easily create static (or even dynamic) inline styles:
use iced::{
    Element, Theme, border, color,
    widget::{button, row},
};

fn main() -> iced::Result {
    iced::run(App::update, App::view)
}

#[derive(Default)]
struct App;

#[derive(Debug, Clone)]
enum Message {
    Noop,
}

impl App {
    fn update(&mut self, message: Message) {
        match message {
            Message::Noop => {}
        }
    }

    fn view(&self) -> Element<'_, Message> {
        row![
            button("Built-in 'danger' style")
                .on_press(Message::Noop)
                .style(button::danger),
            button("User defined inline style")
                .on_press(Message::Noop)
                .style(|_, _| button::Style {
                    background: Some(color!(0x1e1e2e).into()),
                    text_color: color!(0xc0ffee),
                    border: border::rounded(10),
                    ..Default::default()
                }),
            button("User defined style method")
                .on_press(Message::Noop)
                .style(button_danger_text)
        ]
        .spacing(10)
        .into()
    }
}

// This is a *slightly* modified version of button::text
fn button_danger_text(theme: &Theme, status: button::Status) -> button::Style {
    let palette = theme.extended_palette();

    let base = button::Style {
        text_color: palette.danger.base.color,
        ..button::Style::default()
    };

    match status {
        button::Status::Active | button::Status::Pressed => base,
        button::Status::Hovered => button::Style {
            text_color: palette.danger.base.color.scale_alpha(0.8),
            ..base
        },
        button::Status::Disabled => button::Style {
            text_color: palette.danger.base.color.scale_alpha(0.5),
            ..base
        }
    }
}
Notice the two underscores? They’re for the &Theme and Status that get passed to our closure. What’s this Status, you ask? Well, a button may be hovered at a given moment, or it could be disabled, be pressed down, or neither. Taking this into account, lets see how we can create a dynamic styling method:
use iced::{
    Element, Theme, border, color,
    widget::{button, row},
};

fn main() -> iced::Result {
    iced::run(App::update, App::view)
}

#[derive(Default)]
struct App;

#[derive(Debug, Clone)]
enum Message {
    Noop,
}

impl App {
    fn update(&mut self, message: Message) {
        match message {
            Message::Noop => {}
        }
    }

    fn view(&self) -> Element<'_, Message> {
        row![
            button("Built-in 'danger' style")
                .on_press(Message::Noop)
                .style(button::danger),
            button("User defined inline style")
                .on_press(Message::Noop)
                .style(|_, _| button::Style {
                    background: Some(color!(0x1e1e2e).into()),
                    text_color: color!(0xc0ffee),
                    border: border::rounded(10),
                    ..Default::default()
                }),
            button("User defined style method")
                .on_press(Message::Noop)
                .style(button_danger_text)
        ]
        .spacing(10)
        .into()
    }
}

// This is a *slightly* modified version of button::text
fn button_danger_text(theme: &Theme, status: button::Status) -> button::Style {
    let palette = theme.extended_palette();

    let base = button::Style {
        text_color: palette.danger.base.color,
        ..button::Style::default()
    };

    match status {
        button::Status::Active | button::Status::Pressed => base,
        button::Status::Hovered => button::Style {
            text_color: palette.danger.base.color.scale_alpha(0.8),
            ..base
        },
        button::Status::Disabled => button::Style {
            text_color: palette.danger.base.color.scale_alpha(0.5),
            ..base
        }
    }
}
use iced::{
Element, Theme, border, color,
widget::{button, row},
};
fn main() -> iced::Result {
iced::run(App::update, App::view)
}
#[derive(Default)]
struct App;
#[derive(Debug, Clone)]
enum Message {
Noop,
}
impl App {
fn update(&mut self, message: Message) {
match message {
Message::Noop => {}
}
}
fn view(&self) -> Element<'_, Message> {
row![
button("Built-in 'danger' style")
.on_press(Message::Noop)
.style(button::danger),
button("User defined inline style")
.on_press(Message::Noop)
.style(|_, _| button::Style {
background: Some(color!(0x1e1e2e).into()),
text_color: color!(0xc0ffee),
border: border::rounded(10),
..Default::default()
}),
button("User defined style method")
.on_press(Message::Noop)
.style(button_danger_text)
]
.spacing(10)
.into()
}
}
// This is a *slightly* modified version of button::text
fn button_danger_text(theme: &Theme, status: button::Status) -> button::Style {
let palette = theme.extended_palette();
let base = button::Style {
text_color: palette.danger.base.color,
..button::Style::default()
};
match status {
button::Status::Active | button::Status::Pressed => base,
button::Status::Hovered => button::Style {
text_color: palette.danger.base.color.scale_alpha(0.8),
..base
},
button::Status::Disabled => button::Style {
text_color: palette.danger.base.color.scale_alpha(0.5),
..base
}
}
}Complete example
main.rs
use iced::{
    Element, Theme, border, color,
    widget::{button, row},
};

fn main() -> iced::Result {
    iced::run(App::update, App::view)
}

#[derive(Default)]
struct App;

#[derive(Debug, Clone)]
enum Message {
    Noop,
}

impl App {
    fn update(&mut self, message: Message) {
        match message {
            Message::Noop => {}
        }
    }

    fn view(&self) -> Element<'_, Message> {
        row![
            button("Built-in 'danger' style")
                .on_press(Message::Noop)
                .style(button::danger),
            button("User defined inline style")
                .on_press(Message::Noop)
                .style(|_, _| button::Style {
                    background: Some(color!(0x1e1e2e).into()),
                    text_color: color!(0xc0ffee),
                    border: border::rounded(10),
                    ..Default::default()
                }),
            button("User defined style method")
                .on_press(Message::Noop)
                .style(button_danger_text)
        ]
        .spacing(10)
        .into()
    }
}

// This is a *slightly* modified version of button::text
fn button_danger_text(theme: &Theme, status: button::Status) -> button::Style {
    let palette = theme.extended_palette();

    let base = button::Style {
        text_color: palette.danger.base.color,
        ..button::Style::default()
    };

    match status {
        button::Status::Active | button::Status::Pressed => base,
        button::Status::Hovered => button::Style {
            text_color: palette.danger.base.color.scale_alpha(0.8),
            ..base
        },
        button::Status::Disabled => button::Style {
            text_color: palette.danger.base.color.scale_alpha(0.5),
            ..base
        }
    }
}Subscriptions and Tasks
Sometimes you have a task that takes some time to complete and should run in the background. If you run it in your update function, the GUI becomes locked and unresponsive until the task is finished. This could be a web request or an operation that listens for external events.
Iced offers two solutions to this issue: Task and Subscription.
A task runs until it completes, whereas a subscription continues running as long as the application requires it.
In this chapter, we will examine both solutions and explore how to use them.
Tasks
NOTE: in the past
Taskwas calledCommand
A task is “A set of asynchronous actions to be performed by some runtime”.
Basically, a task is just a Stream that returns messages.
You can create custom tasks, but often you get them by some function and just want to execute it. For example, minimizing and maximizing a window requires executing a given task.
A task will run until it has finished and can return multiple messages during its execution.
Executing a Task
In your App, you can execute a task by returning it from the update function of your application.
Batch multiple tasks
Sometimes you want to return more than one task. For that, you can use the Task::batch function to batch a few of them together like this:
return Task::batch(vec![task1, task2, task3]);Custom Task using perform
In this example, we will create an app that fetches your current IP address by making an API call with our own custom task.
Dependencies
As you see, we have two dependencies in our project.
One of them is reqwest. We use reqwest to make the API call.
The other one is iced.
Since this is a guide for iced, that should not wonder you.
But as you see, we added the tokio feature.
This lets iced use tokio as part of the runtime as needed for reqwest.
[dependencies]
iced = { version = "0.14", features = ["tokio"] }
reqwest = "0.12"
Making the api request
At first, we define what our task will do.
For that, we are creating an async function that makes an async get request to an API that provides the public IP.
use iced::Task;

#[derive(Debug, Clone)]
enum Message {
    Refetch,
    CurrentIp(String),
}

#[derive(Default)]
struct App {
    ip: String,
}

impl App {
    fn view(&self) -> iced::Element<'_, Message> {
        iced::widget::column![
            self.ip.as_str(),
            iced::widget::button("Start task").on_press(Message::Refetch)
        ]
        .into()
    }

    fn update(&mut self, message: Message) -> iced::Task<Message> {
        println!("update");

        match message {
            Message::Refetch => Task::perform(fetch_ip(), Message::CurrentIp),
            Message::CurrentIp(text) => {
                self.ip = text;
                Task::none()
            }
        }
    }
}

async fn fetch_ip() -> String {
    println!("fetch_ip");
    reqwest::get("https://api.seeip.org")
        .await
        .unwrap()
        .text()
        .await
        .unwrap()
}

fn main() -> iced::Result {
    iced::run(App::update, App::view)
}
Tip: If you have something that is not async but synchronous and will block your application like a heavy computation, you can use
tokio::spawn_blockingin a task or subscription to run a closure on a thread where blocking is acceptable.
Starting/Creating the task
In the update function we return Task::none() or our custom task depending on the message.
If the Message is Message::CurrentIp we change our state, if it is Message::Refetch we return our task.
use iced::Task;

#[derive(Debug, Clone)]
enum Message {
    Refetch,
    CurrentIp(String),
}

#[derive(Default)]
struct App {
    ip: String,
}

impl App {
    fn view(&self) -> iced::Element<'_, Message> {
        iced::widget::column![
            self.ip.as_str(),
            iced::widget::button("Start task").on_press(Message::Refetch)
        ]
        .into()
    }

    fn update(&mut self, message: Message) -> iced::Task<Message> {
        println!("update");

        match message {
            Message::Refetch => Task::perform(fetch_ip(), Message::CurrentIp),
            Message::CurrentIp(text) => {
                self.ip = text;
                Task::none()
            }
        }
    }
}

async fn fetch_ip() -> String {
    println!("fetch_ip");
    reqwest::get("https://api.seeip.org")
        .await
        .unwrap()
        .text()
        .await
        .unwrap()
}

fn main() -> iced::Result {
    iced::run(App::update, App::view)
}
To create our custom task, we use the Task::perform function.
It takes a future, in this case our fetch_ip function, and a closure that converts the returned value of the future into a message.
use iced::Task;

#[derive(Debug, Clone)]
enum Message {
    Refetch,
    CurrentIp(String),
}

#[derive(Default)]
struct App {
    ip: String,
}

impl App {
    fn view(&self) -> iced::Element<'_, Message> {
        iced::widget::column![
            self.ip.as_str(),
            iced::widget::button("Start task").on_press(Message::Refetch)
        ]
        .into()
    }

    fn update(&mut self, message: Message) -> iced::Task<Message> {
        println!("update");

        match message {
            Message::Refetch => Task::perform(fetch_ip(), Message::CurrentIp),
            Message::CurrentIp(text) => {
                self.ip = text;
                Task::none()
            }
        }
    }
}

async fn fetch_ip() -> String {
    println!("fetch_ip");
    reqwest::get("https://api.seeip.org")
        .await
        .unwrap()
        .text()
        .await
        .unwrap()
}

fn main() -> iced::Result {
    iced::run(App::update, App::view)
}
NOTE:
fetch_ip()produces the future
NOTE:
Message::CurrentIpis a shorthand for|x| Message::CurrentIp(x)
Full Code
use iced::Task;

#[derive(Debug, Clone)]
enum Message {
    Refetch,
    CurrentIp(String),
}

#[derive(Default)]
struct App {
    ip: String,
}

impl App {
    fn view(&self) -> iced::Element<'_, Message> {
        iced::widget::column![
            self.ip.as_str(),
            iced::widget::button("Start task").on_press(Message::Refetch)
        ]
        .into()
    }

    fn update(&mut self, message: Message) -> iced::Task<Message> {
        println!("update");

        match message {
            Message::Refetch => Task::perform(fetch_ip(), Message::CurrentIp),
            Message::CurrentIp(text) => {
                self.ip = text;
                Task::none()
            }
        }
    }
}

async fn fetch_ip() -> String {
    println!("fetch_ip");
    reqwest::get("https://api.seeip.org")
        .await
        .unwrap()
        .text()
        .await
        .unwrap()
}

fn main() -> iced::Result {
    iced::run(App::update, App::view)
}
Task From Stream
Imagine you want a Task that produces more than one Message. One solution is to use Task::run and pass a Stream to it.
A Stream is basically an async iterator.
To create a Stream we can use iced::stream::channel.
With that function, we can convert a Future to a Stream. In the Future we can emit messages via a given Sender.
Subscriptions
A subscription is similar to a task. It runs in the background. Subscriptions are often used to listen to external events. It can produce one or more values. One key difference is that we control how long a subscription runs. That leads to the “issue” that the subscription itself can never end by itself, even after finishing its work.
Warning: I am not that familiar with the iced internals so the following might be incorrect. It is only how I understood it.
Please see the official documentation.
A Subscription runs as long as we return it from the closure provided by the subscription function.
The runtime calls that method after each update and checks if a new or old subscription is provided.
Every Subscription has an ID. This is created by hashing the subscription data and its TypeId when using Subscription::run or Subscription::run_with (the data is the function pointer passed to both and the additional data type in the case of run_with).
If a new subscription is provided, the runtime will start it. If an old one that already runs is provided, nothing happens. If a subscription runs that is not provided by the subscription function, the running subscription is terminated.
Create a Stream
To create a Stream we can use iced::stream::channel.
With that function, we can convert a Future to a Stream. In the future, we can emit messages via a given Sender.
Listen to events
Often you want to do something when the user presses some key, if a file is dropped on your window or general mouse events.
For that, you can use the iced::event::listen subscription. It runs in the background and emits a message with/on every Event.
NOTE: If you just want to get mouse events in a specific widget area you should use the
MouseAreawidget.
Here is a practical example how to listen to an arbitrary event in form of a keyboard event.
In the example, the subscription always runs as defined in the Application::subscription method:
use iced::widget;

#[derive(Debug, Clone)]
enum Message {
    Event(iced::event::Event),
}

fn update(state: &mut u32, message: Message) {
    // handle emitted messages
    match message {
        Message::Event(event) => {
            if let iced::event::Event::Keyboard(iced::keyboard::Event::KeyReleased {
                key, ..
            }) = event
            {
                println!("Key {key:?} was pressed");
                *state += 1;
            }
        }
    }
}

fn view(state: &u32) -> iced::Element<'_, Message> {
    widget::text!("Keys pressed: {}", state).into()
}

fn main() -> iced::Result {
    // run the app from main function
    iced::application(|| 0, update, view)
        .subscription(|_state| iced::event::listen().map(Message::Event))
        .run()
}
It emits a message containing the event:
use iced::widget;

#[derive(Debug, Clone)]
enum Message {
    Event(iced::event::Event),
}

fn update(state: &mut u32, message: Message) {
    // handle emitted messages
    match message {
        Message::Event(event) => {
            if let iced::event::Event::Keyboard(iced::keyboard::Event::KeyReleased {
                key, ..
            }) = event
            {
                println!("Key {key:?} was pressed");
                *state += 1;
            }
        }
    }
}

fn view(state: &u32) -> iced::Element<'_, Message> {
    widget::text!("Keys pressed: {}", state).into()
}

fn main() -> iced::Result {
    // run the app from main function
    iced::application(|| 0, update, view)
        .subscription(|_state| iced::event::listen().map(Message::Event))
        .run()
}
In the update method we can use that event and react to it:
use iced::widget;

#[derive(Debug, Clone)]
enum Message {
    Event(iced::event::Event),
}

fn update(state: &mut u32, message: Message) {
    // handle emitted messages
    match message {
        Message::Event(event) => {
            if let iced::event::Event::Keyboard(iced::keyboard::Event::KeyReleased {
                key, ..
            }) = event
            {
                println!("Key {key:?} was pressed");
                *state += 1;
            }
        }
    }
}

fn view(state: &u32) -> iced::Element<'_, Message> {
    widget::text!("Keys pressed: {}", state).into()
}

fn main() -> iced::Result {
    // run the app from main function
    iced::application(|| 0, update, view)
        .subscription(|_state| iced::event::listen().map(Message::Event))
        .run()
}
Important Note: The example uses
iced::event::listenthat reacts to all kind of events. There are specific subscriptions for special event kinds, such as window, and keyboard events.
Full Code
use iced::widget;

#[derive(Debug, Clone)]
enum Message {
    Event(iced::event::Event),
}

fn update(state: &mut u32, message: Message) {
    // handle emitted messages
    match message {
        Message::Event(event) => {
            if let iced::event::Event::Keyboard(iced::keyboard::Event::KeyReleased {
                key, ..
            }) = event
            {
                println!("Key {key:?} was pressed");
                *state += 1;
            }
        }
    }
}

fn view(state: &u32) -> iced::Element<'_, Message> {
    widget::text!("Keys pressed: {}", state).into()
}

fn main() -> iced::Result {
    // run the app from main function
    iced::application(|| 0, update, view)
        .subscription(|_state| iced::event::listen().map(Message::Event))
        .run()
}
Blocking Code
NOTE: Currently, it is not possible to run blocking code on wasm.
Tokio
If your iced application is using the Tokio runtime, to run blocking code in a Task or a Subscription we can use tokio::task::spawn_blocking.
Example
Here is a small example that shows how to use tokio::task::spawn_blocking.
Cargo.toml
Because we want to use spawn_blocking from tokio we need to add the tokio feature to iced. This will lead to iced using tokio.
iced = { ..., features = [..., "tokio"] }
Actual Example
In the example, there will be a button and a text. A press onto the button will trigger a large computation to be started (in the example, we will just sleep a few seconds and return a number). If the computation finishes, the result will be shown in the text widget.
Our computation runs in a task, because we do not want to block our whole UI until it has finished.
Inside the task we call spawn_blocking with a closure of our computation. To get the returned value of the closure, we need to await the JoinHandle returned by spawn_blocking.
That will give us the result of the heavy computation without blocking the UI.
#[derive(Debug, Clone)]
enum Message {
    CalculatedInformation(i32),
    StartCalculatingInformation,
}

#[derive(Default)]
struct App {
    hard_to_process_information: Option<i32>,
    calculation_in_progress: bool,
}

impl App {
    fn update(&mut self, message: Message) -> iced::Task<Message> {
        match message {
            Message::CalculatedInformation(information) => {
                // Set the information
                self.hard_to_process_information = Some(information);
                self.calculation_in_progress = false;
                iced::Task::none()
            }
            Message::StartCalculatingInformation => {
                // Change the state to indicate that the calculation is in progress
                self.calculation_in_progress = true;
                // Return a task that will calculate the information
                iced::Task::future(async {
                    let information = tokio::task::spawn_blocking(|| {
                        println!("Calculating information...");
                        // Simulate a long computation
                        std::thread::sleep(std::time::Duration::from_secs(2));

                        // return some value
                        42
                    })
                    .await
                    .unwrap();

                    // Send the information back to the update function
                    Message::CalculatedInformation(information)
                })
            }
        }
    }

    fn view(&self) -> iced::Element<'_, Message> {
        iced::widget::column![
            // Display the information if it is available
            iced::widget::Text::new(self.hard_to_process_information.map_or(
                "Information will be ready in a second...".to_string(),
                |x| format!("Information: {x}"),
            )),
            // Display a button to start the calculation
            iced::widget::button("Start Calculation").on_press_maybe(
                if self.calculation_in_progress {
                    None
                } else {
                    Some(Message::StartCalculatingInformation)
                }
            )
        ]
        .into()
    }
}

fn main() -> iced::Result {
    iced::run(App::update, App::view)
}
Full Code
#[derive(Debug, Clone)]
enum Message {
    CalculatedInformation(i32),
    StartCalculatingInformation,
}

#[derive(Default)]
struct App {
    hard_to_process_information: Option<i32>,
    calculation_in_progress: bool,
}

impl App {
    fn update(&mut self, message: Message) -> iced::Task<Message> {
        match message {
            Message::CalculatedInformation(information) => {
                // Set the information
                self.hard_to_process_information = Some(information);
                self.calculation_in_progress = false;
                iced::Task::none()
            }
            Message::StartCalculatingInformation => {
                // Change the state to indicate that the calculation is in progress
                self.calculation_in_progress = true;
                // Return a task that will calculate the information
                iced::Task::future(async {
                    let information = tokio::task::spawn_blocking(|| {
                        println!("Calculating information...");
                        // Simulate a long computation
                        std::thread::sleep(std::time::Duration::from_secs(2));

                        // return some value
                        42
                    })
                    .await
                    .unwrap();

                    // Send the information back to the update function
                    Message::CalculatedInformation(information)
                })
            }
        }
    }

    fn view(&self) -> iced::Element<'_, Message> {
        iced::widget::column![
            // Display the information if it is available
            iced::widget::Text::new(self.hard_to_process_information.map_or(
                "Information will be ready in a second...".to_string(),
                |x| format!("Information: {x}"),
            )),
            // Display a button to start the calculation
            iced::widget::button("Start Calculation").on_press_maybe(
                if self.calculation_in_progress {
                    None
                } else {
                    Some(Message::StartCalculatingInformation)
                }
            )
        ]
        .into()
    }
}

fn main() -> iced::Result {
    iced::run(App::update, App::view)
}
Smol
If your iced application is using the Smol runtime, you can use smol::unblock.
Add smol to cargo.toml:
smol = "2"
#[derive(Debug, Clone)]
struct MeaningOfLife(String);

async fn meaning_of_life() -> MeaningOfLife {
    smol::unblock(|| calculate_meaning()).await
}

fn calculate_meaning() -> MeaningOfLife {
    std::thread::sleep(Duration::from_millis(3000));

    MeaningOfLife(String::from("The meaning of life is 42."))
}
Oneshot Channel
Another way to run blocking code is to use a oneshot channel:
use iced::widget::{button, center, text};
use iced::{Element, Task};

use std::time::Duration;

fn main() -> iced::Result {
    iced::run(App::update, App::view)
}

#[derive(Debug, Clone)]
enum Message {
    FindTheMeaningOfLife,
    TheMeaningOfLife(Option<MeaningOfLife>),
}

#[derive(Default, Debug)]
enum State {
    #[default]
    Unknown,
    Searching,
    Found(MeaningOfLife),
    NotFound,
}

#[derive(Debug, Default)]
struct App {
    state: State,
}

impl App {
    pub fn view(&self) -> Element<'_, Message> {
        let main: Element<_> = match &self.state {
            State::Unknown => button("Find the meaning of life.")
                .on_press(Message::FindTheMeaningOfLife)
                .into(),
            State::Searching => "Searching...".into(),
            State::Found(MeaningOfLife(meaning)) => text(meaning).into(),
            State::NotFound => "Could not find the meaning of life.".into(),
        };

        center(main).into()
    }

    pub fn update(&mut self, message: Message) -> Task<Message> {
        match message {
            Message::FindTheMeaningOfLife => {
                self.state = State::Searching;

                Task::perform(meaning_of_life(), Message::TheMeaningOfLife)
            }
            Message::TheMeaningOfLife(meaning) => {
                self.state = match meaning {
                    Some(meaning) => State::Found(meaning),
                    None => State::NotFound,
                };

                Task::none()
            }
        }
    }
}

#[derive(Debug, Clone)]
struct MeaningOfLife(String);

async fn meaning_of_life() -> Option<MeaningOfLife> {
    use iced::futures::channel;

    // Create a oneshot channel for the thread to send its result.
    let (result_tx, result_rx) = channel::oneshot::channel();

    // Spawn a thread so that our calculation doesn't block the main thread.
    std::thread::spawn(|| {
        let result = calculate_meaning();

        result_tx.send(result).expect("Showing the meaning of life");
    });

    // Wait for our result to arrive.
    result_rx.await.ok()
}

fn calculate_meaning() -> MeaningOfLife {
    // Super long and complicated calculation.
    std::thread::sleep(Duration::from_millis(3000));

    MeaningOfLife(String::from("The meaning of life is 42."))
}
A oneshot channel provides a type-safe way of sending a single value between threads / asynchronous tasks.
Furthermore, this approach does not require any extra dependencies or features as iced conveniently re-exports the futures crate.
Complete Example
use iced::widget::{button, center, text};
use iced::{Element, Task};

use std::time::Duration;

fn main() -> iced::Result {
    iced::run(App::update, App::view)
}

#[derive(Debug, Clone)]
enum Message {
    FindTheMeaningOfLife,
    TheMeaningOfLife(Option<MeaningOfLife>),
}

#[derive(Default, Debug)]
enum State {
    #[default]
    Unknown,
    Searching,
    Found(MeaningOfLife),
    NotFound,
}

#[derive(Debug, Default)]
struct App {
    state: State,
}

impl App {
    pub fn view(&self) -> Element<'_, Message> {
        let main: Element<_> = match &self.state {
            State::Unknown => button("Find the meaning of life.")
                .on_press(Message::FindTheMeaningOfLife)
                .into(),
            State::Searching => "Searching...".into(),
            State::Found(MeaningOfLife(meaning)) => text(meaning).into(),
            State::NotFound => "Could not find the meaning of life.".into(),
        };

        center(main).into()
    }

    pub fn update(&mut self, message: Message) -> Task<Message> {
        match message {
            Message::FindTheMeaningOfLife => {
                self.state = State::Searching;

                Task::perform(meaning_of_life(), Message::TheMeaningOfLife)
            }
            Message::TheMeaningOfLife(meaning) => {
                self.state = match meaning {
                    Some(meaning) => State::Found(meaning),
                    None => State::NotFound,
                };

                Task::none()
            }
        }
    }
}

#[derive(Debug, Clone)]
struct MeaningOfLife(String);

async fn meaning_of_life() -> Option<MeaningOfLife> {
    use iced::futures::channel;

    // Create a oneshot channel for the thread to send its result.
    let (result_tx, result_rx) = channel::oneshot::channel();

    // Spawn a thread so that our calculation doesn't block the main thread.
    std::thread::spawn(|| {
        let result = calculate_meaning();

        result_tx.send(result).expect("Showing the meaning of life");
    });

    // Wait for our result to arrive.
    result_rx.await.ok()
}

fn calculate_meaning() -> MeaningOfLife {
    // Super long and complicated calculation.
    std::thread::sleep(Duration::from_millis(3000));

    MeaningOfLife(String::from("The meaning of life is 42."))
}
Structuring Apps
When you create larger iced apps, you might want to have reusable compositions and views. There are a lot of different ways to structure your app.
To make starting out easier, you’ll find some patterns you can use here.
NOTE: These patterns are just suggestions for how you could solve the problem.
Don’t just follow them blindly and instead look at them more as examples on how you could solve the problem.
You can mix and match these patterns to fit your need or build something entirely different.
To demonstrate our patterns, we’ll build a simple joke listing app throughout this chapter.
Proposed Naming Convention
To support productive discussions and clearer explanations, this guide proposes the following pattern names. These patterns have existed way before this article, but by giving them names, we can e.g. ask about the difference between a Viewable and a Widget?.
The names are in no way official or endorsed by the iced project.
Widget
Before jumping into the Patterns, you should know that iced itself has a Widget trait,
which is used to implement the default widgets like button or row.
While a widget is the most versatile way to draw something on the screen or grab input, it is significantly more complex and difficult to implement.
So before trying to implement a custom widget, we’d recommend you try one of the following patters first.
View-Helper
A view-helper is the simplest way to add some composability to your application.
It’s just a function, which creates an Element.
Viewable
If you expand a view-helper, you might arrive at the viewable pattern.
A viewable is the little brother of a widget. It allows you to enjoy the reusability of a widget without the complexity.
A viewable does not contain any application state itself. It is instead used in building the view from your application state.
If you want to add state or interactions, take a look at the composition pattern
Composition
A composition is a rust module, which can be used to implement an interactive part of your application.
Compositions can hold their own state and be interactive on their own.
The View-Helper Pattern
The view-helper pattern is so simple, it’s hard to even call it a pattern.
You can use a view-helper to make your code more readable or to make a part of your view reusable.
pub fn list(items: &[String], on_delete: impl Fn(usize) -> Message) -> iced::Element<'_, Message> {
    iced::widget::column(
        items.iter()
            .enumerate()
            .map(|(index, item)| {
                iced::row![
                    iced::widget::text(item),
                    iced::widget::button(iced::widget::text("Delete"))
                        .style(iced::widget::button::danger)
                        .on_press(on_delete(index)),
                ].into()
            })
    ).into()
}
Now you can just call this function inside your main view:
impl App {
    pub fn view(&self) -> Element<'_, Message> {
        list(self.items.as_slice(), |index| Message::Delete(index))
    }
}
Conclusion
This approach is great because of it’s simplicity and versatility. You can create these view-helpers, just as you would any other helper function.
A disadvantage of this approach, is that more complex views may require a lot more function parameters or an additional helper struct.
You can also check out the Viewable Pattern as a more sophisticated alternative.
The Viewable Pattern
The viewable pattern is an extension of the view-helper pattern, which allows for a bit cleaner code on the call site.
A viewable is a Struct which is build during the view function in your app and implements Into<iced::Element>.
In practice, it behaves and is used like any other iced widget,
it may contain other iced::Elements or references to your app state, like a &str.
What we want to achieve
Let’s imagine we want to have a list with some additional options.
In our case, we want to display an arbitrary Element,
which could be a text, an image or maybe even a row with both.
Additionally, we want enable adding a delete and an edit button.
Since these buttons will always look the same,
all we need is the Message which should be triggered when the button is clicked.
To make those additional buttons optional, we’ll use an Option<Message>.
If we were to use the view-helper, it could look like this:
fn list_item<'a, Message>(item: iced::Element<'a, Message>, on_delete: Option<Message>, on_edit: Option<Message>) -> iced::Element<'a, Message> {
    // We want the buttons next to the item itself, so we'll use a row.
    let mut row = iced::widget::row![item]
        .spacing(10);

    // Not all lists might allow deleting or editing, so use Options for the on_delete and on_edit Messages.
    // We only add the button if the message is already set.
    if let Some(on_delete) = on_delete {
        row = row.push(iced::widget::button("Delete").on_press(on_delete));
    }

    if let Some(on_edit) = on_edit {
        row = row.push(iced::widget::button("Edit").on_press(on_edit));
    }

    row.into()
}
Now if we want to call this helper, the call site would look like this.
list_item(text("I'm item 1"), Message::Delete(1), Message::Edit(1))This works, but if we wanted to add additional buttons (e.g. duplicate) we’d have to add more and more parameters. After a while our view-helper starts to get less readable.
Wouldn’t it be nice if we could instead call it, like it was a widget?
list_item(text("I'm item 1")
    .on_delete(Message::Delete(1))
    .on_edit(Message::Edit(1))
    .into()
That’s what the Viewable pattern is all about. It allows you to specify options one by one to create a view with.
In the next steps, you’ll learn how to transform our view-helper list_item into a viewable.
Dependencies
To create a viewable, we’ll start with creating its struct, which contains all dependencies we’ll need to build our view tree later.
For this, we just pack all the parameters into a struct like this
// Depending on your use case, you can instead also
// accept types like `&str` or other references to your app state.
pub struct ListItem<'a, Message> {
    item: iced::Element<'a, Message>,
    on_delete: Option<Message>,
    on_edit: Option<Message>,
}

impl<'a, Message> ListItem<'a, Message> {
    // if you can, prefer using `impl Into` for other elements.
    // It makes the callsite look much nicer.
    pub fn new(item: impl Into<iced::Element<'a, Message>>) -> Self {
        Self {
            item: item.into(),
            on_delete: None,
            on_edit: None,
        }
    }

    pub fn on_delete(mut self, message: Message) -> Self {
        self.on_delete = Some(message);
        self
    }

    pub fn on_edit(mut self, message: Message) -> Self {
        self.on_edit = Some(message);
        self
    }
}

impl<'a, Message> From<ListItem<'a, Message>> for iced::Element<'a, Message>
where
    Message: Clone + 'a,
{
    // Here you can put the code which builds the actual view.
    fn from(item_row: ListItem<'a, Message>) -> Self {
        let mut row = iced::widget::row![item_row.item]
            // In your viewable, you can handle things like spacing and alignment,
            // just like you would in your view function.
            .spacing(10);

        if let Some(on_delete) = item_row.on_delete {
            row = row.push(iced::widget::button("Delete").on_press(on_delete));
        }

        if let Some(on_edit) = item_row.on_edit {
            row = row.push(iced::widget::button("Edit").on_press(on_edit));
        }

        row.into()
    }
}
Then we just change the function to accept a ListItem struct.
fn list_item<'a, Message>(list_item: ListItem<'a, Message>) -> iced::Element<'a, Message> {
    // We want the buttons next to the item itself, so we'll use a row.
    let mut row = iced::widget::row![list_item.item]
        .spacing(10);

    // Not all lists might allow deleting or editing, so use Options for the on_delete and on_edit Messages.
    // We only add the button if the message is already set.
    if let Some(on_delete) = list_item.on_delete {
        row = row.push(iced::widget::button("Delete").on_press(on_delete));
    }

    if let Some(on_edit) = list_item.on_edit {
        row = row.push(iced::widget::button("Edit").on_press(on_edit));
    }

    row.into()
}
That doesn’t change all that much though. With this change our callsite would look like this:
list_item(ListItem {
        item: "I'm item 1",
        on_delete: Some(Message::Delete(1)),
        on_edit: Some(Message::Edit(1)),
    }
);
We can already gain a small improvement like this:
impl<'a, Message> ListItem<'a, Message> {
    pub fn into_element(self) -> Element<'a, Message> {
        let mut row = iced::widget::row![item_row.item]
            .spacing(10);

        if let Some(on_delete) = item_row.on_delete {
            row = row.push(iced::widget::button("Delete").on_press(on_delete));
        }

        if let Some(on_edit) = item_row.on_edit {
            row = row.push(iced::widget::button("Edit").on_press(on_edit));
        }

        row.into()
    }
}
Using a method, we can create our ListItem like this:
ListItem {
    item: "I'm item 1",
    on_delete: Some(Message::Delete(1)),
    on_edit: Some(Message::Edit(1)),
}.into_element()
That’s better, but the official widgets use .into(), not a custom method.
For that, we’ll have to implement the From trait.
In most cases you can just copy impl block and function signature like shown here:
// Depending on your use case, you can instead also
// accept types like `&str` or other references to your app state.
pub struct ListItem<'a, Message> {
    item: iced::Element<'a, Message>,
    on_delete: Option<Message>,
    on_edit: Option<Message>,
}

impl<'a, Message> ListItem<'a, Message> {
    // if you can, prefer using `impl Into` for other elements.
    // It makes the callsite look much nicer.
    pub fn new(item: impl Into<iced::Element<'a, Message>>) -> Self {
        Self {
            item: item.into(),
            on_delete: None,
            on_edit: None,
        }
    }

    pub fn on_delete(mut self, message: Message) -> Self {
        self.on_delete = Some(message);
        self
    }

    pub fn on_edit(mut self, message: Message) -> Self {
        self.on_edit = Some(message);
        self
    }
}

impl<'a, Message> From<ListItem<'a, Message>> for iced::Element<'a, Message>
where
    Message: Clone + 'a,
{
    // Here you can put the code which builds the actual view.
    fn from(item_row: ListItem<'a, Message>) -> Self {
        let mut row = iced::widget::row![item_row.item]
            // In your viewable, you can handle things like spacing and alignment,
            // just like you would in your view function.
            .spacing(10);

        if let Some(on_delete) = item_row.on_delete {
            row = row.push(iced::widget::button("Delete").on_press(on_delete));
        }

        if let Some(on_edit) = item_row.on_edit {
            row = row.push(iced::widget::button("Edit").on_press(on_edit));
        }

        row.into()
    }
}
If you want to support custom themes or additional renderers,
you’ll have to specify the additional generic parameters for iced::Element
and set the constraints according to what you need. Since we’re using the default theme and renderer, we can skip this step.
The Builder
Specifying options by chaining commands, like shown above, is called the builder pattern. It’s commonly used in object oriented languages, but is especially common in Rust.
A viewable usually uses the builder pattern to simplify creation and make the callsite more readable. The recommended builder pattern requests all mandatory dependencies in the constructor, while adding optional ones with chainable methods.
NOTE: If you are familiar enough with Rust’s type system, you could also use a typestate-builder to ensure all required dependencies are provided and to control the addition of optional elements.
In practice, this isn’t always the best idea, because it creates more boilerplate and duplicate code.
// Depending on your use case, you can instead also
// accept types like `&str` or other references to your app state.
pub struct ListItem<'a, Message> {
    item: iced::Element<'a, Message>,
    on_delete: Option<Message>,
    on_edit: Option<Message>,
}

impl<'a, Message> ListItem<'a, Message> {
    // if you can, prefer using `impl Into` for other elements.
    // It makes the callsite look much nicer.
    pub fn new(item: impl Into<iced::Element<'a, Message>>) -> Self {
        Self {
            item: item.into(),
            on_delete: None,
            on_edit: None,
        }
    }

    pub fn on_delete(mut self, message: Message) -> Self {
        self.on_delete = Some(message);
        self
    }

    pub fn on_edit(mut self, message: Message) -> Self {
        self.on_edit = Some(message);
        self
    }
}

impl<'a, Message> From<ListItem<'a, Message>> for iced::Element<'a, Message>
where
    Message: Clone + 'a,
{
    // Here you can put the code which builds the actual view.
    fn from(item_row: ListItem<'a, Message>) -> Self {
        let mut row = iced::widget::row![item_row.item]
            // In your viewable, you can handle things like spacing and alignment,
            // just like you would in your view function.
            .spacing(10);

        if let Some(on_delete) = item_row.on_delete {
            row = row.push(iced::widget::button("Delete").on_press(on_delete));
        }

        if let Some(on_edit) = item_row.on_edit {
            row = row.push(iced::widget::button("Edit").on_press(on_edit));
        }

        row.into()
    }
}
Using The Viewable
to use the viewable, we can leverage the builder pattern we just implemented, followed by a call to .into().
In this case, we’re only using on_delete.
This will cause the viewable to add a delete button, but to forfeit the edit button.
impl App {
    fn view(&self) -> iced::Element<'_, Message> {
                    let items = self
                    .items
                    .iter()
                    // since we want deletion, we'll need the index of each item, so we know which one to delete
                    .enumerate()
                    .map(|(index, item)| {
                        // create a listitem for each joke
                        list_item::ListItem::new(iced::widget::text(item))
                            // save the index to delete in the message
                            .on_delete(Message::Delete(index))
                            // since we implemented the `From` trait, we can just use into() to create an element,
                            // just as if we were using a widget
                            .into()
                    })
                    .collect();

                iced::widget::column![
                    iced::widget::button("New").on_press(Message::OpenNewJokeComposition),
                    iced::widget::Column::from_vec(items)
                ]
                // Some spacing goes a long way to make your UI more visually appealing
                .spacing(10)
                .into()
    }
}
Conclusion
The viewable pattern is great way to build your own pseudo-widgets, especially since you can make using them really ergonomic.
In some cases, a viewable might be overkill - you may be interested in the View-Helper for those times.
A Viewable also can’t hold any application state. For that, you could take a look at the Composition Pattern.
The Composition Pattern
Notice: This pattern was called Component Pattern in past versions of this guide
The composition pattern allows you to cleanly structure your application, including your state, update and view logic. This pattern can also be found in this showcase from the founder of iced.
Just like your top-level iced application, a composition implements the Model-View-Update architecture and implements the following:
- The composition state, usually named after its function (e.g.
LoginForm) - Its own
Message - An
Actionenum
In effect, the composition is a self-contained iced program.
The state will have a normal view function that returns an iced::Element<'_, Message>.
The update function will differ a bit. Instead of a Task like our main application, it will return an action enum.
impl MyComposition {
    // instead of this
    pub fn update(&mut self, message: Message) -> Task<Message> {}
    // we implement this
    pub fn update(&mut self, message: Message) -> Action {}
}
Common variants the Action enum can be None, Task(iced::Task<Message>) and Submit { username: String, password: String }. You can think of this action like a message that is sent from the view to the parent application that should handle it.
The State
Your state is usually called after its function, e.g. NewJoke or LazyImage.
It contains the data you are currently working with.
#[derive(Debug, Clone)]
pub enum Message {
    ChangeContent(String),
    RandomJoke,
    Submit,
    Cancel,
}

pub enum Action {
    // The user was happy with the joke and wants to submit it to the list
    Submit(String),
    // The user wants to cancel adding a new joke
    Cancel,
    // The compositions needs to run a task
    Run(iced::Task<Message>),
    // The composition does not require any additional actions
    None,
}

pub struct NewJoke {
    joke: String,
}

impl NewJoke {
    pub fn new() -> Self {
        Self {
            joke: String::new(),
        }
    }
}

impl NewJoke {
    pub fn view(&self) -> iced::Element<'_, Message> {
        iced::widget::column![
            iced::widget::text_input("Content", &self.joke)
                // on_input expects a closure, which would usually look like this:
                // |new_value| Message::ChangeContent(new_value)
                // Thankfully, you can just use the enum variants name directly
                .on_input(Message::ChangeContent),
            iced::widget::button("Random Joke").on_press(Message::RandomJoke),
            iced::widget::row![
                iced::widget::button("Cancel").on_press(Message::Cancel),
                iced::widget::button("Submit").on_press(Message::Submit)
            ]
            .spacing(10),
        ]
        .padding(10)
        .spacing(10)
        .into()
    }
}

impl NewJoke {
    #[must_use]
    pub fn update(&mut self, message: Message) -> Action {
        match message {
            Message::Submit => Action::Submit(self.joke.clone()),
            Message::Cancel => Action::Cancel,
            Message::ChangeContent(content) => {
                self.joke = content;
                Action::None
            }
            Message::RandomJoke => Action::Run(Self::random_joke_task()),
        }
    }

    fn random_joke_task() -> iced::Task<Message> {
        iced::Task::future(async {
            // Fetch a joke from the internet
            let client = reqwest::Client::new();
            let response: serde_json::Value = client
                .get("https://icanhazdadjoke.com")
                .header("Accept", "application/json")
                .send()
                .await
                .unwrap()
                .json()
                .await
                .unwrap();

            // Parse the response
            let joke = response["joke"].as_str().unwrap();

            // Return the joke as a message
            Message::ChangeContent(joke.to_owned())
        })
    }
}
Your state should have a function that creates a new instance.
#[derive(Debug, Clone)]
pub enum Message {
    ChangeContent(String),
    RandomJoke,
    Submit,
    Cancel,
}

pub enum Action {
    // The user was happy with the joke and wants to submit it to the list
    Submit(String),
    // The user wants to cancel adding a new joke
    Cancel,
    // The compositions needs to run a task
    Run(iced::Task<Message>),
    // The composition does not require any additional actions
    None,
}

pub struct NewJoke {
    joke: String,
}

impl NewJoke {
    pub fn new() -> Self {
        Self {
            joke: String::new(),
        }
    }
}

impl NewJoke {
    pub fn view(&self) -> iced::Element<'_, Message> {
        iced::widget::column![
            iced::widget::text_input("Content", &self.joke)
                // on_input expects a closure, which would usually look like this:
                // |new_value| Message::ChangeContent(new_value)
                // Thankfully, you can just use the enum variants name directly
                .on_input(Message::ChangeContent),
            iced::widget::button("Random Joke").on_press(Message::RandomJoke),
            iced::widget::row![
                iced::widget::button("Cancel").on_press(Message::Cancel),
                iced::widget::button("Submit").on_press(Message::Submit)
            ]
            .spacing(10),
        ]
        .padding(10)
        .spacing(10)
        .into()
    }
}

impl NewJoke {
    #[must_use]
    pub fn update(&mut self, message: Message) -> Action {
        match message {
            Message::Submit => Action::Submit(self.joke.clone()),
            Message::Cancel => Action::Cancel,
            Message::ChangeContent(content) => {
                self.joke = content;
                Action::None
            }
            Message::RandomJoke => Action::Run(Self::random_joke_task()),
        }
    }

    fn random_joke_task() -> iced::Task<Message> {
        iced::Task::future(async {
            // Fetch a joke from the internet
            let client = reqwest::Client::new();
            let response: serde_json::Value = client
                .get("https://icanhazdadjoke.com")
                .header("Accept", "application/json")
                .send()
                .await
                .unwrap()
                .json()
                .await
                .unwrap();

            // Parse the response
            let joke = response["joke"].as_str().unwrap();

            // Return the joke as a message
            Message::ChangeContent(joke.to_owned())
        })
    }
}
Handling lazy loading
If you want to lazily load some data from an API, or do something else in the background, you can use an enum to indicate the state. You can either hold that enum as part of your State struct, or just use the enum directly.
pub enum LazyImage {
    Loading,
    Loaded {
        title: String,
        image: Vec<u8>,
    },
    Error(String),
}
If you need to execute some code asynchronously after your composition is created, you can instead return (Self, iced::Task<Message>).
This mirrors iced’s run_with function, which allows you to run a task when starting your application.
impl LazyImage {
    pub fn new(url: String) -> (Self, iced::Task<Message>) {
        let task = iced::Task::spawn(async move {
            // load your image data
            let response = todo!().await;
            match image {
                Ok(data) => Message::Loaded {
                    title: data.title,
                    image: data.body
                },
                Err(error) => Message::Error(error.to_string())
            }
        });

        (Self::Loading, task)
    }
}
Message
Your composition will have its own internal messages, which work just like in your top-level iced application.
For a LoginForm they might look like this:
#[derive(Debug, Clone)]
pub enum Message {
    ChangeContent(String),
    RandomJoke,
    Submit,
    Cancel,
}

pub enum Action {
    // The user was happy with the joke and wants to submit it to the list
    Submit(String),
    // The user wants to cancel adding a new joke
    Cancel,
    // The compositions needs to run a task
    Run(iced::Task<Message>),
    // The composition does not require any additional actions
    None,
}

pub struct NewJoke {
    joke: String,
}

impl NewJoke {
    pub fn new() -> Self {
        Self {
            joke: String::new(),
        }
    }
}

impl NewJoke {
    pub fn view(&self) -> iced::Element<'_, Message> {
        iced::widget::column![
            iced::widget::text_input("Content", &self.joke)
                // on_input expects a closure, which would usually look like this:
                // |new_value| Message::ChangeContent(new_value)
                // Thankfully, you can just use the enum variants name directly
                .on_input(Message::ChangeContent),
            iced::widget::button("Random Joke").on_press(Message::RandomJoke),
            iced::widget::row![
                iced::widget::button("Cancel").on_press(Message::Cancel),
                iced::widget::button("Submit").on_press(Message::Submit)
            ]
            .spacing(10),
        ]
        .padding(10)
        .spacing(10)
        .into()
    }
}

impl NewJoke {
    #[must_use]
    pub fn update(&mut self, message: Message) -> Action {
        match message {
            Message::Submit => Action::Submit(self.joke.clone()),
            Message::Cancel => Action::Cancel,
            Message::ChangeContent(content) => {
                self.joke = content;
                Action::None
            }
            Message::RandomJoke => Action::Run(Self::random_joke_task()),
        }
    }

    fn random_joke_task() -> iced::Task<Message> {
        iced::Task::future(async {
            // Fetch a joke from the internet
            let client = reqwest::Client::new();
            let response: serde_json::Value = client
                .get("https://icanhazdadjoke.com")
                .header("Accept", "application/json")
                .send()
                .await
                .unwrap()
                .json()
                .await
                .unwrap();

            // Parse the response
            let joke = response["joke"].as_str().unwrap();

            // Return the joke as a message
            Message::ChangeContent(joke.to_owned())
        })
    }
}
Embedding our state
To use our composition, we’ll need to add it to our application state.
Depending on your use case, you can embed it directly, as an Option or inside another enum.
For demonstration purposes, we’ll add our own little enum.
mod list_item;
mod new_joke;

fn main() -> iced::Result {
    iced::run(App::update, App::view)
}

#[derive(Debug, Clone)]
enum Message {
    // This message is used to handle the new views message
    NewJoke(new_joke::Message),
    OpenNewJokeComposition,
    Delete(usize),
}

#[derive(Default)]
enum View {
    #[default]
    ListJokes,
    // This holds our new joke compositions state
    NewJoke(new_joke::NewJoke),
}

#[derive(Default)]
struct App {
    view: View,
    items: Vec<String>,
}

impl App {
    fn update(&mut self, message: Message) -> iced::Task<Message> {
        match message {
            Message::NewJoke(view_message) => {
                // as with all enums in rust, we'll need to use an if-let expression
                // to get access to our composition from the `View` enum
                if let View::NewJoke(edit) = &mut self.view {
                    // Call the update method of the edit view
                    // and handle the returned action
                    match edit.update(view_message) {
                        // The none action is a no-op
                        new_joke::Action::None => {}

                        // If the action is a task, we'll need to map it, to ensure it returns the right Message type.
                        // This is the exact same as with `view` and the returned `iced::Element`
                        new_joke::Action::Run(task) => return task.map(Message::NewJoke),

                        // If the action is a cancel, switch back to the list view
                        new_joke::Action::Cancel => {
                            self.view = View::ListJokes;
                        }

                        // If the action is a submit, add the new joke before returning to the list view
                        new_joke::Action::Submit(new_joke_content) => {
                            self.view = View::ListJokes;
                            self.items.push(new_joke_content);
                        }
                    }
                }
            }
            Message::OpenNewJokeComposition => {
                // Create a new composition
                let composition = new_joke::NewJoke::new();
                self.view = View::NewJoke(composition);
            }
            Message::Delete(index) => {
                self.items.remove(index);
            }
        }
        iced::Task::none()
    }

    fn view(&self) -> iced::Element<'_, Message> {
        match &self.view {
            View::ListJokes => {
                let items = self
                    .items
                    .iter()
                    // since we want deletion, we'll need the index of each item, so we know which one to delete
                    .enumerate()
                    .map(|(index, item)| {
                        // create a listitem for each joke
                        list_item::ListItem::new(iced::widget::text(item))
                            // save the index to delete in the message
                            .on_delete(Message::Delete(index))
                            // since we implemented the `From` trait, we can just use into() to create an element,
                            // just as if we were using a widget
                            .into()
                    })
                    .collect();

                iced::widget::column![
                    iced::widget::button("New").on_press(Message::OpenNewJokeComposition),
                    iced::widget::Column::from_vec(items)
                ]
                // Some spacing goes a long way to make your UI more visually appealing
                .spacing(10)
                .into()
            }
            // If the view is an edit view, call the view method of the edit view
            // and map the returned message to the higher level message
            View::NewJoke(new_joke) => new_joke.view().map(Message::NewJoke),
        }
    }
}
Now that we have a nice way to specify out view, let’s add it to the apps state:
mod list_item;
mod new_joke;

fn main() -> iced::Result {
    iced::run(App::update, App::view)
}

#[derive(Debug, Clone)]
enum Message {
    // This message is used to handle the new views message
    NewJoke(new_joke::Message),
    OpenNewJokeComposition,
    Delete(usize),
}

#[derive(Default)]
enum View {
    #[default]
    ListJokes,
    // This holds our new joke compositions state
    NewJoke(new_joke::NewJoke),
}

#[derive(Default)]
struct App {
    view: View,
    items: Vec<String>,
}

impl App {
    fn update(&mut self, message: Message) -> iced::Task<Message> {
        match message {
            Message::NewJoke(view_message) => {
                // as with all enums in rust, we'll need to use an if-let expression
                // to get access to our composition from the `View` enum
                if let View::NewJoke(edit) = &mut self.view {
                    // Call the update method of the edit view
                    // and handle the returned action
                    match edit.update(view_message) {
                        // The none action is a no-op
                        new_joke::Action::None => {}

                        // If the action is a task, we'll need to map it, to ensure it returns the right Message type.
                        // This is the exact same as with `view` and the returned `iced::Element`
                        new_joke::Action::Run(task) => return task.map(Message::NewJoke),

                        // If the action is a cancel, switch back to the list view
                        new_joke::Action::Cancel => {
                            self.view = View::ListJokes;
                        }

                        // If the action is a submit, add the new joke before returning to the list view
                        new_joke::Action::Submit(new_joke_content) => {
                            self.view = View::ListJokes;
                            self.items.push(new_joke_content);
                        }
                    }
                }
            }
            Message::OpenNewJokeComposition => {
                // Create a new composition
                let composition = new_joke::NewJoke::new();
                self.view = View::NewJoke(composition);
            }
            Message::Delete(index) => {
                self.items.remove(index);
            }
        }
        iced::Task::none()
    }

    fn view(&self) -> iced::Element<'_, Message> {
        match &self.view {
            View::ListJokes => {
                let items = self
                    .items
                    .iter()
                    // since we want deletion, we'll need the index of each item, so we know which one to delete
                    .enumerate()
                    .map(|(index, item)| {
                        // create a listitem for each joke
                        list_item::ListItem::new(iced::widget::text(item))
                            // save the index to delete in the message
                            .on_delete(Message::Delete(index))
                            // since we implemented the `From` trait, we can just use into() to create an element,
                            // just as if we were using a widget
                            .into()
                    })
                    .collect();

                iced::widget::column![
                    iced::widget::button("New").on_press(Message::OpenNewJokeComposition),
                    iced::widget::Column::from_vec(items)
                ]
                // Some spacing goes a long way to make your UI more visually appealing
                .spacing(10)
                .into()
            }
            // If the view is an edit view, call the view method of the edit view
            // and map the returned message to the higher level message
            View::NewJoke(new_joke) => new_joke.view().map(Message::NewJoke),
        }
    }
}
Before we can enjoy our beautiful composition, we’ll need to actually create the composition’s state somewhere. In our case, we want to show it, after the user clicks an “Add Joke” button.
For that we’ll just add a button to the app’s view method and edit the app’s update function to include this:
impl App {
    fn update(&mut self, message: Message) -> iced::Task<Message> {
        match message {
            Message::OpenNewJokeComposition => {
                // Create a new composition
                let composition = new_joke::NewJoke::new();
                self.view = View::NewJoke(composition);
            }
            // ...
        }
    }
}
View & Mapping
Following the trend of mirroring what an iced application does, you’ll also want to implement a view function.
#[derive(Debug, Clone)]
pub enum Message {
    ChangeContent(String),
    RandomJoke,
    Submit,
    Cancel,
}

pub enum Action {
    // The user was happy with the joke and wants to submit it to the list
    Submit(String),
    // The user wants to cancel adding a new joke
    Cancel,
    // The compositions needs to run a task
    Run(iced::Task<Message>),
    // The composition does not require any additional actions
    None,
}

pub struct NewJoke {
    joke: String,
}

impl NewJoke {
    pub fn new() -> Self {
        Self {
            joke: String::new(),
        }
    }
}

impl NewJoke {
    pub fn view(&self) -> iced::Element<'_, Message> {
        iced::widget::column![
            iced::widget::text_input("Content", &self.joke)
                // on_input expects a closure, which would usually look like this:
                // |new_value| Message::ChangeContent(new_value)
                // Thankfully, you can just use the enum variants name directly
                .on_input(Message::ChangeContent),
            iced::widget::button("Random Joke").on_press(Message::RandomJoke),
            iced::widget::row![
                iced::widget::button("Cancel").on_press(Message::Cancel),
                iced::widget::button("Submit").on_press(Message::Submit)
            ]
            .spacing(10),
        ]
        .padding(10)
        .spacing(10)
        .into()
    }
}

impl NewJoke {
    #[must_use]
    pub fn update(&mut self, message: Message) -> Action {
        match message {
            Message::Submit => Action::Submit(self.joke.clone()),
            Message::Cancel => Action::Cancel,
            Message::ChangeContent(content) => {
                self.joke = content;
                Action::None
            }
            Message::RandomJoke => Action::Run(Self::random_joke_task()),
        }
    }

    fn random_joke_task() -> iced::Task<Message> {
        iced::Task::future(async {
            // Fetch a joke from the internet
            let client = reqwest::Client::new();
            let response: serde_json::Value = client
                .get("https://icanhazdadjoke.com")
                .header("Accept", "application/json")
                .send()
                .await
                .unwrap()
                .json()
                .await
                .unwrap();

            // Parse the response
            let joke = response["joke"].as_str().unwrap();

            // Return the joke as a message
            Message::ChangeContent(joke.to_owned())
        })
    }
}
Now we’ll obviously want to use this view as part of our main view.
But our main view expects a return value of iced::Element<crate::Message>, while our view returns iced::Element<new_joke::Message>.
Thankfully, iced allows us to map them.
First we’ll need to add a message variant to our main Message.
// Main Application Message
pub enum Message
{
    NewJoke(new_joke::Message),
    // ...
}
After that we can actually call the view method of our new composiotion.
To map our Message, we can simply use iced::Element<composition::Message>.map(crate::Message::Composition).
NOTE: this is a shortcut for
iced::Element<composition::Message>.map(|composition_message| crate::Message::Composition(composition_message))
impl App {
    fn view(&self) -> iced::Element<'_, Message> {
        match &self.view {
            View::NewJoke(new_joke) => new_joke.view().map(Message::NewJoke),
            // ...
        }
    }
}
The .map function takes a closure that takes the message and converts it into another message.
This often requires having a dedicated message variant on the application level that contains the view message.
Map functions like this are available on Task::map, Subscription::map, Element::map.
Update & Action
As already hinted in the beginning, the update function of a composition does have a significant change compared to a normal iced application.
Instead of returning an iced::Task, we return an Action.
An Action allows us to communicate with the parent of our composition. In that regard, they are similar to events from other UI frameworks.
Some applications, like Halloy actually do call this type Event instead of Action.
First we’ll start by defining our compositions’s action type:
#[derive(Debug, Clone)]
pub enum Message {
    ChangeContent(String),
    RandomJoke,
    Submit,
    Cancel,
}

pub enum Action {
    // The user was happy with the joke and wants to submit it to the list
    Submit(String),
    // The user wants to cancel adding a new joke
    Cancel,
    // The compositions needs to run a task
    Run(iced::Task<Message>),
    // The composition does not require any additional actions
    None,
}

pub struct NewJoke {
    joke: String,
}

impl NewJoke {
    pub fn new() -> Self {
        Self {
            joke: String::new(),
        }
    }
}

impl NewJoke {
    pub fn view(&self) -> iced::Element<'_, Message> {
        iced::widget::column![
            iced::widget::text_input("Content", &self.joke)
                // on_input expects a closure, which would usually look like this:
                // |new_value| Message::ChangeContent(new_value)
                // Thankfully, you can just use the enum variants name directly
                .on_input(Message::ChangeContent),
            iced::widget::button("Random Joke").on_press(Message::RandomJoke),
            iced::widget::row![
                iced::widget::button("Cancel").on_press(Message::Cancel),
                iced::widget::button("Submit").on_press(Message::Submit)
            ]
            .spacing(10),
        ]
        .padding(10)
        .spacing(10)
        .into()
    }
}

impl NewJoke {
    #[must_use]
    pub fn update(&mut self, message: Message) -> Action {
        match message {
            Message::Submit => Action::Submit(self.joke.clone()),
            Message::Cancel => Action::Cancel,
            Message::ChangeContent(content) => {
                self.joke = content;
                Action::None
            }
            Message::RandomJoke => Action::Run(Self::random_joke_task()),
        }
    }

    fn random_joke_task() -> iced::Task<Message> {
        iced::Task::future(async {
            // Fetch a joke from the internet
            let client = reqwest::Client::new();
            let response: serde_json::Value = client
                .get("https://icanhazdadjoke.com")
                .header("Accept", "application/json")
                .send()
                .await
                .unwrap()
                .json()
                .await
                .unwrap();

            // Parse the response
            let joke = response["joke"].as_str().unwrap();

            // Return the joke as a message
            Message::ChangeContent(joke.to_owned())
        })
    }
}
With our action ready, we can add our update function. To make the update method easier to read, we handle task creation in a seperate function.
#[derive(Debug, Clone)]
pub enum Message {
    ChangeContent(String),
    RandomJoke,
    Submit,
    Cancel,
}

pub enum Action {
    // The user was happy with the joke and wants to submit it to the list
    Submit(String),
    // The user wants to cancel adding a new joke
    Cancel,
    // The compositions needs to run a task
    Run(iced::Task<Message>),
    // The composition does not require any additional actions
    None,
}

pub struct NewJoke {
    joke: String,
}

impl NewJoke {
    pub fn new() -> Self {
        Self {
            joke: String::new(),
        }
    }
}

impl NewJoke {
    pub fn view(&self) -> iced::Element<'_, Message> {
        iced::widget::column![
            iced::widget::text_input("Content", &self.joke)
                // on_input expects a closure, which would usually look like this:
                // |new_value| Message::ChangeContent(new_value)
                // Thankfully, you can just use the enum variants name directly
                .on_input(Message::ChangeContent),
            iced::widget::button("Random Joke").on_press(Message::RandomJoke),
            iced::widget::row![
                iced::widget::button("Cancel").on_press(Message::Cancel),
                iced::widget::button("Submit").on_press(Message::Submit)
            ]
            .spacing(10),
        ]
        .padding(10)
        .spacing(10)
        .into()
    }
}

impl NewJoke {
    #[must_use]
    pub fn update(&mut self, message: Message) -> Action {
        match message {
            Message::Submit => Action::Submit(self.joke.clone()),
            Message::Cancel => Action::Cancel,
            Message::ChangeContent(content) => {
                self.joke = content;
                Action::None
            }
            Message::RandomJoke => Action::Run(Self::random_joke_task()),
        }
    }

    fn random_joke_task() -> iced::Task<Message> {
        iced::Task::future(async {
            // Fetch a joke from the internet
            let client = reqwest::Client::new();
            let response: serde_json::Value = client
                .get("https://icanhazdadjoke.com")
                .header("Accept", "application/json")
                .send()
                .await
                .unwrap()
                .json()
                .await
                .unwrap();

            // Parse the response
            let joke = response["joke"].as_str().unwrap();

            // Return the joke as a message
            Message::ChangeContent(joke.to_owned())
        })
    }
}
As with the view before, we’ll now need to call our composition from the app’s main update function.
Our composition’s update function now returns an Action that we’ll want to react to.
NOTE: As with our view before, we’ll have to map the task, should one be returned.
impl App {
    fn update(&mut self, message: Message) -> iced::Task<Message> {
        match message {
            Message::NewJoke(view_message) => {
                // as with all enums in rust, we'll need to use an if-let expression
                // to get access to our composition from the `View` enum
                if let View::NewJoke(edit) = &mut self.view {
                    // Call the update method of the edit view
                    // and handle the returned action
                    match edit.update(view_message) {
                        // The none action is a no-op
                        new_joke::Action::None => {}

                        // If the action is a task, we'll need to map it, to ensure it returns the right Message type.
                        // This is the exact same as with `view` and the returned `iced::Element`
                        new_joke::Action::Run(task) => return task.map(Message::NewJoke),

                        // If the action is a cancel, switch back to the list view
                        new_joke::Action::Cancel => {
                            self.view = View::ListJokes;
                        }

                        // If the action is a submit, add the new joke before returning to the list view
                        new_joke::Action::Submit(new_joke_content) => {
                            self.view = View::ListJokes;
                            self.items.push(new_joke_content);
                        }
                    }
                }
            }
            // ...
        }
    }
}
After hooking up the view and update functions, we’re done.
Conclusion
The composition pattern is the default way to divide your state and update logic into smaller pieces. Keep in mind that default doesn’t necessarily mean it’s the right solution for you.
This pattern is great because it’s structured just like your iced application and encompasses everything you need for that part of the application.
It does, however, introduce a lot of boilerplate code, which isn’t always warranted.
If you don’t need the internal state and update logic, you might instead be more interested in the Viewable Pattern.
Full Code of the Example
main.rs:
mod list_item;
mod new_joke;

fn main() -> iced::Result {
    iced::run(App::update, App::view)
}

#[derive(Debug, Clone)]
enum Message {
    // This message is used to handle the new views message
    NewJoke(new_joke::Message),
    OpenNewJokeComposition,
    Delete(usize),
}

#[derive(Default)]
enum View {
    #[default]
    ListJokes,
    // This holds our new joke compositions state
    NewJoke(new_joke::NewJoke),
}

#[derive(Default)]
struct App {
    view: View,
    items: Vec<String>,
}

impl App {
    fn update(&mut self, message: Message) -> iced::Task<Message> {
        match message {
            Message::NewJoke(view_message) => {
                // as with all enums in rust, we'll need to use an if-let expression
                // to get access to our composition from the `View` enum
                if let View::NewJoke(edit) = &mut self.view {
                    // Call the update method of the edit view
                    // and handle the returned action
                    match edit.update(view_message) {
                        // The none action is a no-op
                        new_joke::Action::None => {}

                        // If the action is a task, we'll need to map it, to ensure it returns the right Message type.
                        // This is the exact same as with `view` and the returned `iced::Element`
                        new_joke::Action::Run(task) => return task.map(Message::NewJoke),

                        // If the action is a cancel, switch back to the list view
                        new_joke::Action::Cancel => {
                            self.view = View::ListJokes;
                        }

                        // If the action is a submit, add the new joke before returning to the list view
                        new_joke::Action::Submit(new_joke_content) => {
                            self.view = View::ListJokes;
                            self.items.push(new_joke_content);
                        }
                    }
                }
            }
            Message::OpenNewJokeComposition => {
                // Create a new composition
                let composition = new_joke::NewJoke::new();
                self.view = View::NewJoke(composition);
            }
            Message::Delete(index) => {
                self.items.remove(index);
            }
        }
        iced::Task::none()
    }

    fn view(&self) -> iced::Element<'_, Message> {
        match &self.view {
            View::ListJokes => {
                let items = self
                    .items
                    .iter()
                    // since we want deletion, we'll need the index of each item, so we know which one to delete
                    .enumerate()
                    .map(|(index, item)| {
                        // create a listitem for each joke
                        list_item::ListItem::new(iced::widget::text(item))
                            // save the index to delete in the message
                            .on_delete(Message::Delete(index))
                            // since we implemented the `From` trait, we can just use into() to create an element,
                            // just as if we were using a widget
                            .into()
                    })
                    .collect();

                iced::widget::column![
                    iced::widget::button("New").on_press(Message::OpenNewJokeComposition),
                    iced::widget::Column::from_vec(items)
                ]
                // Some spacing goes a long way to make your UI more visually appealing
                .spacing(10)
                .into()
            }
            // If the view is an edit view, call the view method of the edit view
            // and map the returned message to the higher level message
            View::NewJoke(new_joke) => new_joke.view().map(Message::NewJoke),
        }
    }
}
list_item.rs:
// Depending on your use case, you can instead also
// accept types like `&str` or other references to your app state.
pub struct ListItem<'a, Message> {
    item: iced::Element<'a, Message>,
    on_delete: Option<Message>,
    on_edit: Option<Message>,
}

impl<'a, Message> ListItem<'a, Message> {
    // if you can, prefer using `impl Into` for other elements.
    // It makes the callsite look much nicer.
    pub fn new(item: impl Into<iced::Element<'a, Message>>) -> Self {
        Self {
            item: item.into(),
            on_delete: None,
            on_edit: None,
        }
    }

    pub fn on_delete(mut self, message: Message) -> Self {
        self.on_delete = Some(message);
        self
    }

    pub fn on_edit(mut self, message: Message) -> Self {
        self.on_edit = Some(message);
        self
    }
}

impl<'a, Message> From<ListItem<'a, Message>> for iced::Element<'a, Message>
where
    Message: Clone + 'a,
{
    // Here you can put the code which builds the actual view.
    fn from(item_row: ListItem<'a, Message>) -> Self {
        let mut row = iced::widget::row![item_row.item]
            // In your viewable, you can handle things like spacing and alignment,
            // just like you would in your view function.
            .spacing(10);

        if let Some(on_delete) = item_row.on_delete {
            row = row.push(iced::widget::button("Delete").on_press(on_delete));
        }

        if let Some(on_edit) = item_row.on_edit {
            row = row.push(iced::widget::button("Edit").on_press(on_edit));
        }

        row.into()
    }
}new_joke.rs:
#[derive(Debug, Clone)]
pub enum Message {
    ChangeContent(String),
    RandomJoke,
    Submit,
    Cancel,
}

pub enum Action {
    // The user was happy with the joke and wants to submit it to the list
    Submit(String),
    // The user wants to cancel adding a new joke
    Cancel,
    // The compositions needs to run a task
    Run(iced::Task<Message>),
    // The composition does not require any additional actions
    None,
}

pub struct NewJoke {
    joke: String,
}

impl NewJoke {
    pub fn new() -> Self {
        Self {
            joke: String::new(),
        }
    }
}

impl NewJoke {
    pub fn view(&self) -> iced::Element<'_, Message> {
        iced::widget::column![
            iced::widget::text_input("Content", &self.joke)
                // on_input expects a closure, which would usually look like this:
                // |new_value| Message::ChangeContent(new_value)
                // Thankfully, you can just use the enum variants name directly
                .on_input(Message::ChangeContent),
            iced::widget::button("Random Joke").on_press(Message::RandomJoke),
            iced::widget::row![
                iced::widget::button("Cancel").on_press(Message::Cancel),
                iced::widget::button("Submit").on_press(Message::Submit)
            ]
            .spacing(10),
        ]
        .padding(10)
        .spacing(10)
        .into()
    }
}

impl NewJoke {
    #[must_use]
    pub fn update(&mut self, message: Message) -> Action {
        match message {
            Message::Submit => Action::Submit(self.joke.clone()),
            Message::Cancel => Action::Cancel,
            Message::ChangeContent(content) => {
                self.joke = content;
                Action::None
            }
            Message::RandomJoke => Action::Run(Self::random_joke_task()),
        }
    }

    fn random_joke_task() -> iced::Task<Message> {
        iced::Task::future(async {
            // Fetch a joke from the internet
            let client = reqwest::Client::new();
            let response: serde_json::Value = client
                .get("https://icanhazdadjoke.com")
                .header("Accept", "application/json")
                .send()
                .await
                .unwrap()
                .json()
                .await
                .unwrap();

            // Parse the response
            let joke = response["joke"].as_str().unwrap();

            // Return the joke as a message
            Message::ChangeContent(joke.to_owned())
        })
    }
}
Component
Important Notice: The Component trait is currently deprecated, and I strongly advise against its use. It is in the process of being undeprecated (or rather blessed), see the bless-component branch.
If you are interested in creating reusable components in the meantime, take a look at the App Structure section.
Sometimes you want to create your own reusable custom components that you can reuse through your applications.
That is where the Component trait comes in place. You can turn anything that implements this trait easily into an Element with the component function.
Components should only be used as reusable widgets and not for organizing code or splitting your applications into different parts!
NOTE: Component is only available on crate feature
lazy.
The 3 parts of a Component
Each component is build out of three parts: the component itself, the state of the component and the internal message of the component.
These are similar to the 3 parts of your application with one difference. The internal state that can change based on events is represented as an extra a struct, not as the component struct itself.
Creating a Hyperlink Example
Component itself
At first, we create the component struct itself:
use iced::widget;
use iced::widget::Component;
pub struct Hyperlink {
    link: String,
}

impl Hyperlink {
    pub fn new(link: String) -> Self {
        Self { link }
    }
}

#[derive(Debug, Copy, Clone)]
pub enum HyperlinkEvent {
    Clicked,
    MouseEnter,
    MouseExit,
}

#[derive(Default)]
pub struct HyperlinkState {
    hovered: bool,
}

impl<Message> Component<Message> for Hyperlink {
    type State = HyperlinkState;
    type Event = HyperlinkEvent;

    fn update(&mut self, state: &mut Self::State, event: Self::Event) -> Option<Message> {
        match event {
            HyperlinkEvent::Clicked => println!("open link"),
            HyperlinkEvent::MouseEnter => state.hovered = true,
            HyperlinkEvent::MouseExit => state.hovered = false,
        }
        None
    }

    fn view(
        &self,
        state: &Self::State,
    ) -> iced::Element<'_, Self::Event, iced::Theme, iced::Renderer> {
        let hovered = state.hovered;
        widget::container(
            widget::mouse_area(widget::text(&self.link).style(move |_| {
                iced::widget::text::Style {
                    color: if hovered {
                        Some(iced::Color::from_rgb(0.5, 0.5, 0.5))
                    } else {
                        Some(iced::Color::from_rgb(0.0, 0.0, 0.0))
                    },
                }
            }))
            .on_enter(HyperlinkEvent::MouseEnter)
            .on_exit(HyperlinkEvent::MouseExit)
            .on_press(HyperlinkEvent::Clicked),
        )
        .into()
    }
}
As you see, it has one field link. Here, we store the link that will be displayed and opened when the hyperlink is clicked.
Message / Event
Now we need to create the message that will be used inside our component:
use iced::widget;
use iced::widget::Component;
pub struct Hyperlink {
    link: String,
}

impl Hyperlink {
    pub fn new(link: String) -> Self {
        Self { link }
    }
}

#[derive(Debug, Copy, Clone)]
pub enum HyperlinkEvent {
    Clicked,
    MouseEnter,
    MouseExit,
}

#[derive(Default)]
pub struct HyperlinkState {
    hovered: bool,
}

impl<Message> Component<Message> for Hyperlink {
    type State = HyperlinkState;
    type Event = HyperlinkEvent;

    fn update(&mut self, state: &mut Self::State, event: Self::Event) -> Option<Message> {
        match event {
            HyperlinkEvent::Clicked => println!("open link"),
            HyperlinkEvent::MouseEnter => state.hovered = true,
            HyperlinkEvent::MouseExit => state.hovered = false,
        }
        None
    }

    fn view(
        &self,
        state: &Self::State,
    ) -> iced::Element<'_, Self::Event, iced::Theme, iced::Renderer> {
        let hovered = state.hovered;
        widget::container(
            widget::mouse_area(widget::text(&self.link).style(move |_| {
                iced::widget::text::Style {
                    color: if hovered {
                        Some(iced::Color::from_rgb(0.5, 0.5, 0.5))
                    } else {
                        Some(iced::Color::from_rgb(0.0, 0.0, 0.0))
                    },
                }
            }))
            .on_enter(HyperlinkEvent::MouseEnter)
            .on_exit(HyperlinkEvent::MouseExit)
            .on_press(HyperlinkEvent::Clicked),
        )
        .into()
    }
}
Here we have three events for our component. The Clicked event is called every time the user clicks onto the component.
The MouseEnter and MouseExit events are called when the mouse enters over the component and leaves (in other words, hovering over the component).
State
In the state of our component, we store if the mouse hovers over the component.
use iced::widget;
use iced::widget::Component;
pub struct Hyperlink {
    link: String,
}

impl Hyperlink {
    pub fn new(link: String) -> Self {
        Self { link }
    }
}

#[derive(Debug, Copy, Clone)]
pub enum HyperlinkEvent {
    Clicked,
    MouseEnter,
    MouseExit,
}

#[derive(Default)]
pub struct HyperlinkState {
    hovered: bool,
}

impl<Message> Component<Message> for Hyperlink {
    type State = HyperlinkState;
    type Event = HyperlinkEvent;

    fn update(&mut self, state: &mut Self::State, event: Self::Event) -> Option<Message> {
        match event {
            HyperlinkEvent::Clicked => println!("open link"),
            HyperlinkEvent::MouseEnter => state.hovered = true,
            HyperlinkEvent::MouseExit => state.hovered = false,
        }
        None
    }

    fn view(
        &self,
        state: &Self::State,
    ) -> iced::Element<'_, Self::Event, iced::Theme, iced::Renderer> {
        let hovered = state.hovered;
        widget::container(
            widget::mouse_area(widget::text(&self.link).style(move |_| {
                iced::widget::text::Style {
                    color: if hovered {
                        Some(iced::Color::from_rgb(0.5, 0.5, 0.5))
                    } else {
                        Some(iced::Color::from_rgb(0.0, 0.0, 0.0))
                    },
                }
            }))
            .on_enter(HyperlinkEvent::MouseEnter)
            .on_exit(HyperlinkEvent::MouseExit)
            .on_press(HyperlinkEvent::Clicked),
        )
        .into()
    }
}
Implementing the Component trait
Now we can implement the Component trait for the Hyperlink struct.
Full Implementation
use iced::widget;
use iced::widget::Component;
pub struct Hyperlink {
    link: String,
}

impl Hyperlink {
    pub fn new(link: String) -> Self {
        Self { link }
    }
}

#[derive(Debug, Copy, Clone)]
pub enum HyperlinkEvent {
    Clicked,
    MouseEnter,
    MouseExit,
}

#[derive(Default)]
pub struct HyperlinkState {
    hovered: bool,
}

impl<Message> Component<Message> for Hyperlink {
    type State = HyperlinkState;
    type Event = HyperlinkEvent;

    fn update(&mut self, state: &mut Self::State, event: Self::Event) -> Option<Message> {
        match event {
            HyperlinkEvent::Clicked => println!("open link"),
            HyperlinkEvent::MouseEnter => state.hovered = true,
            HyperlinkEvent::MouseExit => state.hovered = false,
        }
        None
    }

    fn view(
        &self,
        state: &Self::State,
    ) -> iced::Element<'_, Self::Event, iced::Theme, iced::Renderer> {
        let hovered = state.hovered;
        widget::container(
            widget::mouse_area(widget::text(&self.link).style(move |_| {
                iced::widget::text::Style {
                    color: if hovered {
                        Some(iced::Color::from_rgb(0.5, 0.5, 0.5))
                    } else {
                        Some(iced::Color::from_rgb(0.0, 0.0, 0.0))
                    },
                }
            }))
            .on_enter(HyperlinkEvent::MouseEnter)
            .on_exit(HyperlinkEvent::MouseExit)
            .on_press(HyperlinkEvent::Clicked),
        )
        .into()
    }
}
Types
We define the types for our state and message/event:
use iced::widget;
use iced::widget::Component;
pub struct Hyperlink {
    link: String,
}

impl Hyperlink {
    pub fn new(link: String) -> Self {
        Self { link }
    }
}

#[derive(Debug, Copy, Clone)]
pub enum HyperlinkEvent {
    Clicked,
    MouseEnter,
    MouseExit,
}

#[derive(Default)]
pub struct HyperlinkState {
    hovered: bool,
}

impl<Message> Component<Message> for Hyperlink {
    type State = HyperlinkState;
    type Event = HyperlinkEvent;

    fn update(&mut self, state: &mut Self::State, event: Self::Event) -> Option<Message> {
        match event {
            HyperlinkEvent::Clicked => println!("open link"),
            HyperlinkEvent::MouseEnter => state.hovered = true,
            HyperlinkEvent::MouseExit => state.hovered = false,
        }
        None
    }

    fn view(
        &self,
        state: &Self::State,
    ) -> iced::Element<'_, Self::Event, iced::Theme, iced::Renderer> {
        let hovered = state.hovered;
        widget::container(
            widget::mouse_area(widget::text(&self.link).style(move |_| {
                iced::widget::text::Style {
                    color: if hovered {
                        Some(iced::Color::from_rgb(0.5, 0.5, 0.5))
                    } else {
                        Some(iced::Color::from_rgb(0.0, 0.0, 0.0))
                    },
                }
            }))
            .on_enter(HyperlinkEvent::MouseEnter)
            .on_exit(HyperlinkEvent::MouseExit)
            .on_press(HyperlinkEvent::Clicked),
        )
        .into()
    }
}
View and Update logic
Every time an event is called, the update and view function gets called.
In the update function, we set the hovered field of the state or print “open link”. Instead of printing something you could use crates like opener to open files and website, but that is beyond this example.
use iced::widget;
use iced::widget::Component;
pub struct Hyperlink {
    link: String,
}

impl Hyperlink {
    pub fn new(link: String) -> Self {
        Self { link }
    }
}

#[derive(Debug, Copy, Clone)]
pub enum HyperlinkEvent {
    Clicked,
    MouseEnter,
    MouseExit,
}

#[derive(Default)]
pub struct HyperlinkState {
    hovered: bool,
}

impl<Message> Component<Message> for Hyperlink {
    type State = HyperlinkState;
    type Event = HyperlinkEvent;

    fn update(&mut self, state: &mut Self::State, event: Self::Event) -> Option<Message> {
        match event {
            HyperlinkEvent::Clicked => println!("open link"),
            HyperlinkEvent::MouseEnter => state.hovered = true,
            HyperlinkEvent::MouseExit => state.hovered = false,
        }
        None
    }

    fn view(
        &self,
        state: &Self::State,
    ) -> iced::Element<'_, Self::Event, iced::Theme, iced::Renderer> {
        let hovered = state.hovered;
        widget::container(
            widget::mouse_area(widget::text(&self.link).style(move |_| {
                iced::widget::text::Style {
                    color: if hovered {
                        Some(iced::Color::from_rgb(0.5, 0.5, 0.5))
                    } else {
                        Some(iced::Color::from_rgb(0.0, 0.0, 0.0))
                    },
                }
            }))
            .on_enter(HyperlinkEvent::MouseEnter)
            .on_exit(HyperlinkEvent::MouseExit)
            .on_press(HyperlinkEvent::Clicked),
        )
        .into()
    }
}
As you see, we return None in the update function. Instead of None we could return a Some(Message) that is propagated to the parent application.
We define in the view function how our component looks on the screen.
In this case, we have a mouse area with a text inside.
The text color changes when the mouse is hovered over the component.
If the mouse hovers above the component is determined by the state.hovered field that is hold up to date by our update function.
use iced::widget;
use iced::widget::Component;
pub struct Hyperlink {
    link: String,
}

impl Hyperlink {
    pub fn new(link: String) -> Self {
        Self { link }
    }
}

#[derive(Debug, Copy, Clone)]
pub enum HyperlinkEvent {
    Clicked,
    MouseEnter,
    MouseExit,
}

#[derive(Default)]
pub struct HyperlinkState {
    hovered: bool,
}

impl<Message> Component<Message> for Hyperlink {
    type State = HyperlinkState;
    type Event = HyperlinkEvent;

    fn update(&mut self, state: &mut Self::State, event: Self::Event) -> Option<Message> {
        match event {
            HyperlinkEvent::Clicked => println!("open link"),
            HyperlinkEvent::MouseEnter => state.hovered = true,
            HyperlinkEvent::MouseExit => state.hovered = false,
        }
        None
    }

    fn view(
        &self,
        state: &Self::State,
    ) -> iced::Element<'_, Self::Event, iced::Theme, iced::Renderer> {
        let hovered = state.hovered;
        widget::container(
            widget::mouse_area(widget::text(&self.link).style(move |_| {
                iced::widget::text::Style {
                    color: if hovered {
                        Some(iced::Color::from_rgb(0.5, 0.5, 0.5))
                    } else {
                        Some(iced::Color::from_rgb(0.0, 0.0, 0.0))
                    },
                }
            }))
            .on_enter(HyperlinkEvent::MouseEnter)
            .on_exit(HyperlinkEvent::MouseExit)
            .on_press(HyperlinkEvent::Clicked),
        )
        .into()
    }
}
Dialogs
Iced does not provide a dialog api.
There are two ways to create dialogs:
- OS-Native dialogs
- Dialogs with multiple windows
OS-Native Dialogs
To create native-looking dialogs, you can use the Rusty File Dialog crate.
Opening Files
Scenario
Imagine that you’re creating a simple image viewer, and you want to load an image you’ve recently downloaded.
You have a simple prototype, but not sure what to do at open_image:
use iced::widget::image;

enum Error {
    InvalidImage,
}

pub enum Message {
    /// Open the file dialog.
    OpenImage,

    /// An image has been loaded.
    ImageLoaded(Result<image::Handle, Error>),

    /// The user changed their mind.
    FileCancelled
}

// Your app's update function.
pub fn update(&mut self, message: Message) -> Task<Message> {
    match self {
        Message::OpenImage => open_image(),

        /* Additional code omitted for simplicity */
        _ => Task::none()
    }
}

pub fn open_image() -> Task<Message> {
    todo!()
}
Solution
Use rfd::AsyncFileDialog’s pick_file in combination with iced’s Task.
use iced::Alignment::Center;
use iced::widget::{button, center, column, image};
use iced::{Element, Task};

fn main() -> iced::Result {
    iced::run(App::update, App::view)
}

#[derive(Debug, Clone)]
#[allow(dead_code)]
enum Error {
    InvalidImage,
}

#[derive(Debug, Clone)]
enum Message {
    OpenImage,
    ImageLoaded(Result<image::Handle, Error>),
    FileCancelled,
}

#[derive(Default)]
struct App {
    loaded_image: Option<image::Handle>,
}

impl App {
    pub fn view(&self) -> Element<'_, Message> {
        center(
            column![button("Open Image").on_press(Message::OpenImage)]
                .push(self.loaded_image.as_ref().map(image))
                .align_x(Center),
        )
        .into()
    }

    pub fn update(&mut self, message: Message) -> Task<Message> {
        match message {
            Message::OpenImage => open_image(),
            Message::ImageLoaded(result) => match result {
                Ok(handle) => {
                    self.loaded_image = Some(handle);
                    Task::none()
                }
                Err(_) => Task::none(),
            },
            Message::FileCancelled => Task::none(),
        }
    }
}

fn open_image() -> Task<Message> {
    Task::future(
        rfd::AsyncFileDialog::new()
            .add_filter( // <-- (OPTIONAL) Add a filter to only allow PNG and JPEG formats.
                "Image Formats",
                &["png", "jpg", "jpeg"],
            )
            .pick_file(), // <-- Launch the dialog window.
    )
    .then(|handle| match handle {
        // After obtaining a file handle from the dialog, we load the image.
        //
        // We use Task::perform to run load_image, as this may take a while to load.
        Some(file_handle) => Task::perform(load_image(file_handle), Message::ImageLoaded),

        // The user has cancelled the operation, so we return a "Cancelled" message.
        None => Task::done(Message::FileCancelled),
    })
}

/// Simplified code to load an image.
///
/// In practice, you may explore other options,
/// but this goes beyond the scope of this tutorial.
async fn load_image(handle: rfd::FileHandle) -> Result<image::Handle, Error> {
    Ok(image::Handle::from_path(handle.path()))
}
When you pick a file/folder, it will return an Option<Filehandle>, as the user might change their mind.
We leverege the Task’s monadic api to make this implementation succinct and clean.
Complete Example
main.rs
use iced::Alignment::Center;
use iced::widget::{button, center, column, image};
use iced::{Element, Task};

fn main() -> iced::Result {
    iced::run(App::update, App::view)
}

#[derive(Debug, Clone)]
#[allow(dead_code)]
enum Error {
    InvalidImage,
}

#[derive(Debug, Clone)]
enum Message {
    OpenImage,
    ImageLoaded(Result<image::Handle, Error>),
    FileCancelled,
}

#[derive(Default)]
struct App {
    loaded_image: Option<image::Handle>,
}

impl App {
    pub fn view(&self) -> Element<'_, Message> {
        center(
            column![button("Open Image").on_press(Message::OpenImage)]
                .push(self.loaded_image.as_ref().map(image))
                .align_x(Center),
        )
        .into()
    }

    pub fn update(&mut self, message: Message) -> Task<Message> {
        match message {
            Message::OpenImage => open_image(),
            Message::ImageLoaded(result) => match result {
                Ok(handle) => {
                    self.loaded_image = Some(handle);
                    Task::none()
                }
                Err(_) => Task::none(),
            },
            Message::FileCancelled => Task::none(),
        }
    }
}

fn open_image() -> Task<Message> {
    Task::future(
        rfd::AsyncFileDialog::new()
            .add_filter( // <-- (OPTIONAL) Add a filter to only allow PNG and JPEG formats.
                "Image Formats",
                &["png", "jpg", "jpeg"],
            )
            .pick_file(), // <-- Launch the dialog window.
    )
    .then(|handle| match handle {
        // After obtaining a file handle from the dialog, we load the image.
        //
        // We use Task::perform to run load_image, as this may take a while to load.
        Some(file_handle) => Task::perform(load_image(file_handle), Message::ImageLoaded),

        // The user has cancelled the operation, so we return a "Cancelled" message.
        None => Task::done(Message::FileCancelled),
    })
}

/// Simplified code to load an image.
///
/// In practice, you may explore other options,
/// but this goes beyond the scope of this tutorial.
async fn load_image(handle: rfd::FileHandle) -> Result<image::Handle, Error> {
    Ok(image::Handle::from_path(handle.path()))
}
Saving Files
To open a save-file dialog, use rfd::AsyncFileDialog’s save_file
use std::path::PathBuf;

use iced::widget::{button, center};
use iced::{Element, Task};

fn main() -> iced::Result {
    iced::run(App::update, App::view)
}

#[derive(Debug, Clone)]
pub enum Message {
    Save,
    Exported(Result<PathBuf, Error>),
    ExportCancelled,
}

#[derive(Debug, Default)]
struct App;

impl App {
    pub fn update(&mut self, message: Message) -> Task<Message> {
        match message {
            Message::Save => return export_build_info(),
            Message::Exported(Ok(destination)) => {
                let _ = open::that(destination);
            }
            Message::Exported(Err(_error)) => (),
            Message::ExportCancelled => (),
        }
        Task::none()
    }

    pub fn view(&self) -> Element<'_, Message> {
        center(button("Export Build Information").on_press(Message::Save)).into()
    }
}

pub fn export_build_info() -> Task<Message> {
    Task::future(
        rfd::AsyncFileDialog::new()
            .set_file_name("build info.txt")
            .save_file(),
    )
    .then(|handle| match handle {
        Some(handle) => Task::perform(save_build_info(handle), Message::Exported),
        None => Task::done(Message::ExportCancelled),
    })
}

#[derive(Debug, Clone)]
pub enum Error {
    Io { reason: String },
}

pub async fn save_build_info(handle: rfd::FileHandle) -> Result<PathBuf, Error> {
    static BUILD_INFO: &str = "Build Date: 07/07/2025\nVersion: 1.2.3";

    handle
        .write(BUILD_INFO.as_bytes())
        .await
        .map(|_| handle.path().to_path_buf())
        .map_err(|error| Error::Io {
            reason: error.to_string(),
        })
}
Similar to pick_file, save_file will return an an Option<Filehandle>,
Complete Example
main.rs
use std::path::PathBuf;

use iced::widget::{button, center};
use iced::{Element, Task};

fn main() -> iced::Result {
    iced::run(App::update, App::view)
}

#[derive(Debug, Clone)]
pub enum Message {
    Save,
    Exported(Result<PathBuf, Error>),
    ExportCancelled,
}

#[derive(Debug, Default)]
struct App;

impl App {
    pub fn update(&mut self, message: Message) -> Task<Message> {
        match message {
            Message::Save => return export_build_info(),
            Message::Exported(Ok(destination)) => {
                let _ = open::that(destination);
            }
            Message::Exported(Err(_error)) => (),
            Message::ExportCancelled => (),
        }
        Task::none()
    }

    pub fn view(&self) -> Element<'_, Message> {
        center(button("Export Build Information").on_press(Message::Save)).into()
    }
}

pub fn export_build_info() -> Task<Message> {
    Task::future(
        rfd::AsyncFileDialog::new()
            .set_file_name("build info.txt")
            .save_file(),
    )
    .then(|handle| match handle {
        Some(handle) => Task::perform(save_build_info(handle), Message::Exported),
        None => Task::done(Message::ExportCancelled),
    })
}

#[derive(Debug, Clone)]
pub enum Error {
    Io { reason: String },
}

pub async fn save_build_info(handle: rfd::FileHandle) -> Result<PathBuf, Error> {
    static BUILD_INFO: &str = "Build Date: 07/07/2025\nVersion: 1.2.3";

    handle
        .write(BUILD_INFO.as_bytes())
        .await
        .map(|_| handle.path().to_path_buf())
        .map_err(|error| Error::Io {
            reason: error.to_string(),
        })
}
Svg
This is an example of including a svg in the application binary and using it in a performant/optimized way, where the handle is only created from the .svg once (using LazyLock).
use iced::widget::svg::{Handle, Svg};
use std::sync::LazyLock;

// the handle is only created once
pub static ARROW_LEFT: LazyLock<Handle> =
    LazyLock::new(|| Handle::from_memory(include_bytes!("arrow-left.svg")));

// this can be called in view to get a ready to use svg
pub fn arrow_left() -> Svg<'_> {
    Svg::new(ARROW_LEFT.clone()).width(iced::Shrink)
}
Render Backend
Forcing Software Rendering:
By default, Iced tries to use wgpu as the backend, and if that is not possible, it uses tiny-skia as a fallback software renderer.
If you want to specifically use tiny-skia as render backend, you can do that temporarily by setting the ICED_BACKEND environment variable to tiny-skia, e.g.
ICED_BACKEND=tiny-skia cargo run
A more permanent solution can be achieved by disabling default features and re-enabling everything you need except for wgpu:
[dependencies]
iced = { version = "0.14", default-features = false, features = [
    "tiny-skia",
    "x11",
    "wayland",
    "smol",
    "image"
] }
Selecting a Graphics Backend for WGPU:
For Hardware Accelerated Rendering(i.e. Using a GPU to render) Iced uses WGPU.
WGPU by itself can use various graphics APIs like OpenGL, Vulkan, DirectX, Metal, etc.
To force a specific graphics backend for WGPU you can set an environemnt variable WGPU_BACKEND = vulkan:
# /path/to/project/.cargo/config.toml

[env]
WGPU_BACKEND = "vulkan" # It can have these values: dx12 / vulkan / metal / gl
Wasm / Running on Web
Iced has the ability to compile to web assembly (WASM). With that, you can run your iced app in the normal web browser.
When run on the web, iced uses a canvas to render the application to it.
Previously, there was the iced_web repository that used another approach, but since it was hard to maintain, support was dropped. As of today, iced_web is out of date and not maintained.
Preparation
Before we start, we need to get the tools for compiling for the web.
Add Wasm Target
First, we need to add the wasm32-unknown-unknown target to our compiler so that we are able to compile to wasm.
rustup target add wasm32-unknown-unknown
If you want, you can compile to that target using
cargo build --target wasm32-unknown-unknown
Install Trunk
We will use trunk for building and serving the web page. For that, we need to install trunk via cargo:
cargo install --locked trunk
Create index.html
For trunk we need to create a index.html file in the root of your project that trunk will use as the base file.
<!DOCTYPE html>
<html lang="en">
<head>
    <meta charset="utf-8" content="text/html; charset=utf-8" />
    <meta name="viewport" content="width=device-width, initial-scale=1" />
    <title>NAME OF THE WEBSITE</title>
    <base data-trunk-public-url />
</head>
<body style="margin: 0; padding: 0; width:100%; height:100svh">
<link data-trunk rel="rust" href="Cargo.toml" data-wasm-opt="z" data-bin="{project name}" />
</body>
</html>
Iced Features that are important for wasm
web-colorson the web, the colors of your app might not be correct or as intended, this feature fixes that. It’s enabled by default.webglmakes your app run in browsers that do not support wgpu (sadly, wgpu is not supported on all browsers and all platforms).
Running the App using Trunk
trunk serve
This will compile your project to wasm, build a web page, watch for changes and serve the app for you. You can access the web app at the URL given in the output.
The generated site that is served is located in the dist directory.
Deploying the Web app
For now, we only used trunk serve to run our app.
This works fine for development, but is not very good for production.
We don’t need to watch for changes in our files and rebuild/autoload them in production. Without that functionality, the served html can be way smaller.
Thankfully, we can use trunk build to build our app into a minimal result.
If you look at the dist directory, you can see your build app (index.html as the starting point).
Disclaimer: If you try to open the index.html file without a web server that serves it, you will run into CORS issues.
You can serve these files on any web server.
As a minimal example, you can use the built-in python web server and execute python3 -m http.server in the dist directory.
Styled Text
When you first try to style text on wasm, like making text bold, you quickly notice that it does not work.
Why is that? Iced with default features, only loads Fira Sans Regular as a font.
This being a single weight font, limits the styling capabilities.
The advantage by only loading a very small font is to reduce the load time/size.
To fix that, you can simple download more fonts as you need from github and load them into your Application by using the font method like this:
.font(include_bytes!("FiraSans-Bold.ttf"))Since this is only necessary on wasm, if your app runs on native and wasm, you should only load it when compiling to wasm.
Debugging Wasm (ready)
If you encounter panics and errors in your browser console from your wasm builds, you might notice that these errors are nearly impossible to interpret.
To get a better error with a notice where exactly in your code the panic occurred, you have to change the panic hook to one that provides better exceptions in your browser.
For that, we can use the crate console_error_panic_hook.
To use that one you need to set the panic hook at the start of your program like here:
fn main() {
    std::panic::set_hook(Box::new(console_error_panic_hook::hook));

    // ...
}
With that in place, the errors in your web console should look a lot better.
Comet
Comet is a companion tool of iced that provides debugging capabilites and performance metrics. It also supports custom metrics and, as an advantage of the Elm Architecture, time travel.
NOTE: This section is W.I.P.
For now, you can find out more about Comet here
Widget API
Disclaimer: This section is based on version 0.14! If you are using a newer version of Iced the API will be different!
In rare cases, you might want to write a custom widget. A custom widget gives you full control over the layout and drawing process. A custom widget is defined as something that implements the Widget trait.
You might want to use other existing widgets in your custom widget. It is recommended that you store them as Elements in your widget struct. When calling methods on the children that take the state Tree, you need to make sure to pass the correct child tree from tree.children to the child widget.
To get detailed examples of the Widget trait you can always take a look at the core widgets like Button.
Generics of the Widget trait
The Widget trait has three different generics.
Message
The Message generic is the message type that your widget can emit. It should be left generic to fit into any application that wants to use the widget. That is why it is common not to create the message hardcoded, but to take a Message as a parameter or a function that generates the appropriate message instead.
Good examples of this are Button where the message can be set with the on_press and is saved in the Button struct:
pub fn on_press(mut self, on_press: Message) -> Self {
    self.on_press = Some(OnPress::Direct(on_press));
    self
}
or the TextInput that takes a message in its on_input method to generate the appropriate message:
pub fn on_input(
    mut self,
    on_input: impl Fn(String) -> Message + 'a,
) -> Self {
    self.on_input = Some(Box::new(on_input));
    self
}
Theme
The Theme generic specifies the type of the theme. To keep it simple, you could stay with the iced provided ones and use iced::Theme.
Renderer
The Renderer generic specifies the renderer that is used to draw your widget.
For most widgets, you can use a generic that implements iced::advanced::Renderer, since this trait has the renderer interface that is most used (as far as I can tell).
There are also traits like the one for SVGs that you might need for specific use cases, such as SVGs.
Displaying Text
Displaying text in your widget can be quite difficult, taking on non-temporary state, handling and aligning of a Paragraph etc. The easiest way I found is to just use a normal text widget instead of using the text renderer directly.
Common Structs
Limits
The limits contain the maximum space that the widget can take in the layout.
They contain the minimum limit that describes the space that the widget will get either way. So even if the given node is smaller, the space will be only used for that widget.
If the widget with shrink as width is placed in a row with an item that has set its size to fill, the minimum limit will be 0. If both widths are set to Fill, it will get the minimum limit of half the space that the row takes.
If the Size of the returned node is larger than the maximum specified by the limits, as far as I tested in rows and columns, other widgets that come after the widget will have just less space available (in their layout methods). But it is not recommended to take more space than there is specified as the maximum in the limits.
Nodes
A Node is a rectangle with position and size that can have a list of children.
You can move or translate its position with the move_to and translate position. The node also provides a lot of other helper methods that are worth looking at (i.e., padding).
Trees
A tree with the current state of the widget and all the states of its children.
Methods of the Widget trait
State (child states), Tag and Diff
A widget can have a state or be stateless. A widget state can contain data that should live longer than the widget itself. A widget itself lives quite short. After each view call, it gets recreated. The scrollable, for example, saves the scroll position in its state. That way, the scroll position stays after each view call.
If your widget has a state, you need to implement the tag and state methods; otherwise, you can just use the default implementation. If you reuse other widgets that have a state, you are required to implement the children method.
State method
At best, the state of your widget is created once and will be reused as much as possible. The state method returns the initial state of your widget if a new one needs to be created. It could look like this:
fn state(&self) -> iced::advanced::widget::tree::State {
	iced::advanced::widget::tree::State::new(YourCustomState::default())
}
Tag method
To identify the different states, the Tag is used. The tag method returns a Tag based on your state type. Internally, it uses the TypeId of your state to identify it.
NOTE: You are right if you think: “If if uses the type ID, can two of my widget states be accidentally swapped?”, you are right. They can. For those cases the diff method should fix it.
For most use cases, the tag method will look like this:
fn tag(&self) -> iced::advanced::widget::tree::Tag {
	iced::advanced::widget::tree::Tag::of::<YourCustomState>()
}
If you have a widget that is stateless, you can just use the default implementation from the
Widgettrait.
diff
This function compares/reconciles the old state Tree, with what you would expect it to be. If there should be something different, you change it in the given tree.
There are two cases where this is needed. The first one is when two states with the same tag are accidentally swapped. In the second one, the state should change based on data passed to the widget in a view call.
If your widget has child widgets, it should contain something like this to diff the children:
fn diff(&self, tree: &mut Tree) {
	tree.diff_children(&self.children);
}
children
If your widget uses other children, you need to return their state Trees from the children method. The order of the child Trees returned determines the order of tree.children in all other methods.
This method could look like this:
fn children(&self) -> Vec<Tree> {
	vec![Tree::new(&self.content)]
}
size
The size method returns the size of the widget. That size can be used by other widgets to find a good layout. A good example of this is iced::advanced::layout::flex.
The size method could look like this:
fn size(&self) -> iced::Size<iced::Length> {
    iced::Size::new(iced::Length::Shrink, iced::Length::Fill)
}
layout
The layout method defines the layout of the widget and all of its child widgets. It returns a Node that represents the layout of the widget and all of its children.
To do that, you are given the Limits of the widget, meaning the minimum and maximum size that the widget can get, and the current state Tree.
If you have child widgets, you need to call their layout methods with their state from tree.children, the Renderer (you can simply use the one that is given as a parameter) and limits you want to assign to the child. The returned Node shall be included in the returned node.children of your widget.
draw
The draw function uses the given Renderer to draw the widget onto the screen. The renderer can implement different Renderer traits.
With the given viewport, you can know what region of your window is currently visible.
In general, your widget should use the theme provided colors to fit into the application style. The text color is provided by the style parameter.
You can access the position, area and layout of your children via the given Layout parameter. The order of child layouts provided in layout.children() is equal to the order of node.children returned by the layout method.
To draw child widgets, you can simply call their draw methods with the appropriate state (from tree.children) and layout (from layout.children()).
Since you might want to draw some special effect or graphic depending on the mouse position, you can access it if available with the Cursor parameter.
operate
This function applies some given operation.
The Operation can have different effects.
You should apply all the appropriate functions of the Operation trait. To do so, you pass your state to the function and an Id that identifies your state.
Of course, you should only apply functions that are used. If your widget can not be focused, you should not call the focusable function.
If your widget has a child widget that does some operations, your operate method could look like this:
fn operate(
	&self,
	tree: &mut Tree,
	layout: Layout<'_>,
	renderer: &Renderer,
	operation: &mut dyn Operation,
) {
    operation.container(self.id.as_ref(), layout.bounds());
    operation.traverse(&mut |operation| {
        self.content.as_widget_mut().operate(
            tree,
            layout.children().next().unwrap(),
            renderer,
            operation,
        );
    });
}
If you are interested in implementing operations for your widget, see the operation section.
update
The update method processes an Event.
The Cursor parameter provides access to the current mouse position.
The Clipboard parameter gives access to the clipboard of the user’s system.
This is the only method of your widget that can emit messages to the application. For that, a Shell is provided as a parameter.
But the Shell can do other things as well. You can check if the current layout is valid or invalidate it, request redraws, check if the widget tree is valid and invalidate the widget tree, etc.
You must manually trigger redraws in update if your widget is meant to be interactive. You can take a look at Button’s update method to see how it reacts to mouse interactions.
You can also capture events if you want to sign to ancestor widgets that they should ignore it, and check whether the event you received is captured so you may ignore it yourself. This is optional, and widgets can choose to ignore that a certain event is captured, reacting to it all the same.
NOTE: If you want to check for the event being captured by child widgets, make sure to call
updateon them first and then check whether the event is captured.
If you have child widgets that you want to produce messages that are local to your widget, just like a component, you can create a new Shell and give it to them in the update method.
If you want to do some animations, you can trigger/request redraws with the shell until the animation is over, possibly making use of the animation module.
mouse_interaction
This method returns the current mouse Interaction.
A mouse interaction is mostly how the cursor is displayed. You often see your cursor changes when you are resizing or moving some element on the screen.
If your widget, for example, has some area that can be grabbed and moved, you can return the Interaction::Move while the cursor is over that area to change the look of the cursor.
overlay
This method returns the overlay of the widget if there is any. A good example of this can be found in the form of the tooltip widget.
If you have child widgets it could look something like this:
fn overlay<'b>(
    &'b mut self,
    tree: &'b mut Tree,
    layout: Layout<'b>,
    renderer: &Renderer,
    viewport: &Rectangle,
    translation: Vector,
) -> Option<overlay::Element<'b, Message, Theme, Renderer>> {
    overlay::from_children(
        &mut self.children,
        tree,
        layout,
        renderer,
        viewport,
        translation
    )
}
Operations
Operations can query and update a widget state.
An operation provides specific functions defined in the Operation trait. These functions take the state of the widget and an identifier to locate the relevant state/widget.
For common operations like focusable and text editing widgets there are fixed functions in the Operation trait. These functions require the states to implement unified traits such as Focusable and TextInput.
If you want some custom operation that is unique to your widget, you can do that with the custom function of the Operation trait.
These functions are provided to the widgets, and it is their job to apply them in their operate function.
To launch/start/emit and Operation you will need to send a Task to the runtime. You can create the Task using the helper function operate.
Custom Operation
If you want to create a custom Operation it is convention to create a trait for it. All the widget states that the operation can be applied to should implement this trait.
In your implementation of the Operation trait, you will need to implement the custom method.
This function takes a dynamic type Any that will be the state and an Id that identifies the widget state.
You can downcast the state to a trait object that matches the previous defined trait that your state implements.
After downcasting the state you can use the methods provided by your trait to modify the state.